

I had a rock problem in my arena. A HUGE rock problem. And when I searched online for answers, I mostly saw ideas like "hire little kids" and "do it by hand little by little", and a few mechanized rock pickers that I knew from watching wouldn't work for me. I rented every concievable piece of rock-picking, landscaping equipment available, and all I got was a lot of dust and still lots of rocks. So I spent two years thinking and designing, and looking at pictures and videos of the old 1920's Thomas Rock Picker that is enormous but works the way I thought it should.
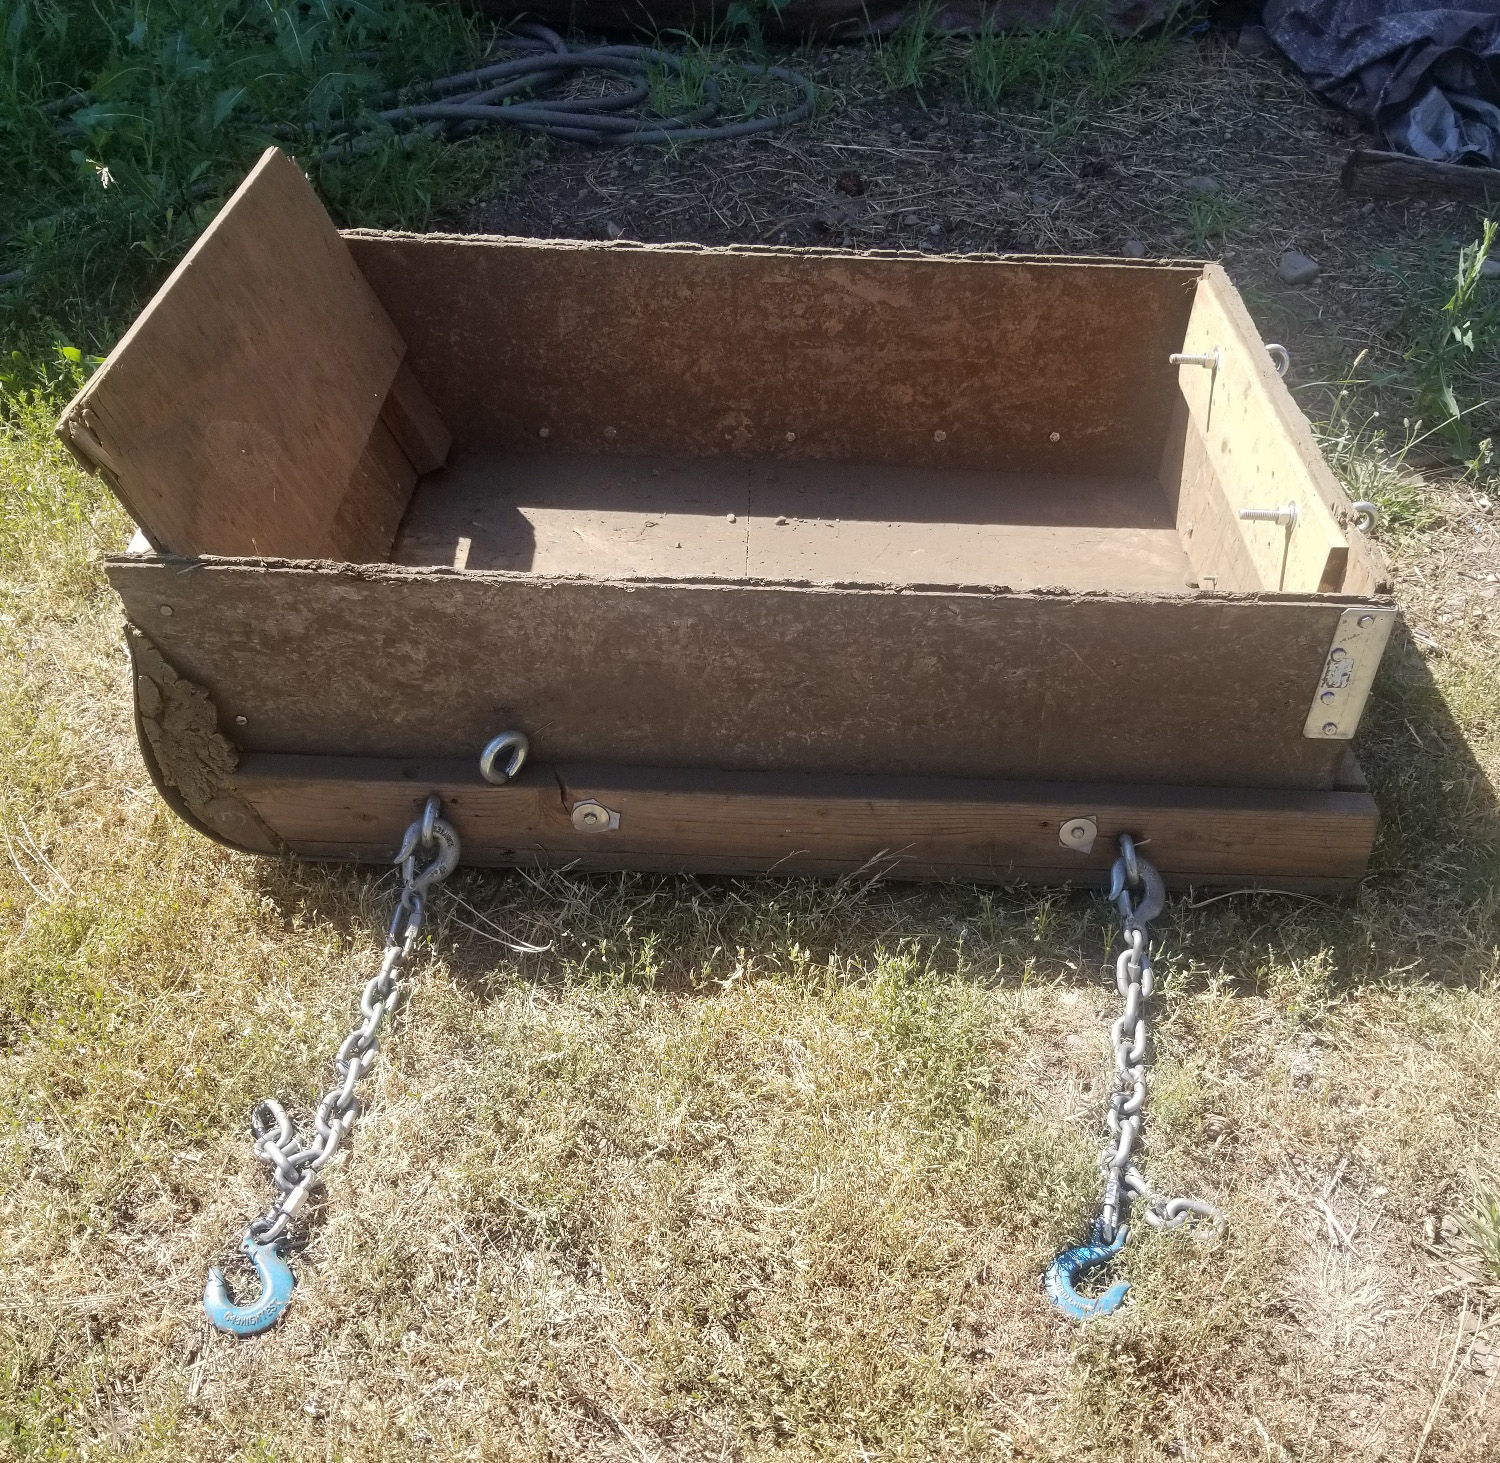
And this is what I came up with. Designed and built from scratch by me, and it works. After lots of failed prototypes and breakdowns from using substandard materials (they were prototypes, after all - I wanted proof of concept before I spent big bucks on the finished pieces and parts), I got it right. It works like a dream - it's just SWEET. It digs up the top layer of dirt and rocks, shakes the sand and dirt through, and tosses the clean rocks out the back into a big "stone boat" (a big tub that glides over the ground like a sled). When the stone boat is full I disconnect everything and drag the stone boat to the rock pile, dump it, and then drag it back and hook everything up again and collect more rocks. And it collects rocks from bigger than my fist down to about 1/2" to 3/4", all the rocks that make my uber-sensitive OTTB dressage diva trip and stumble.
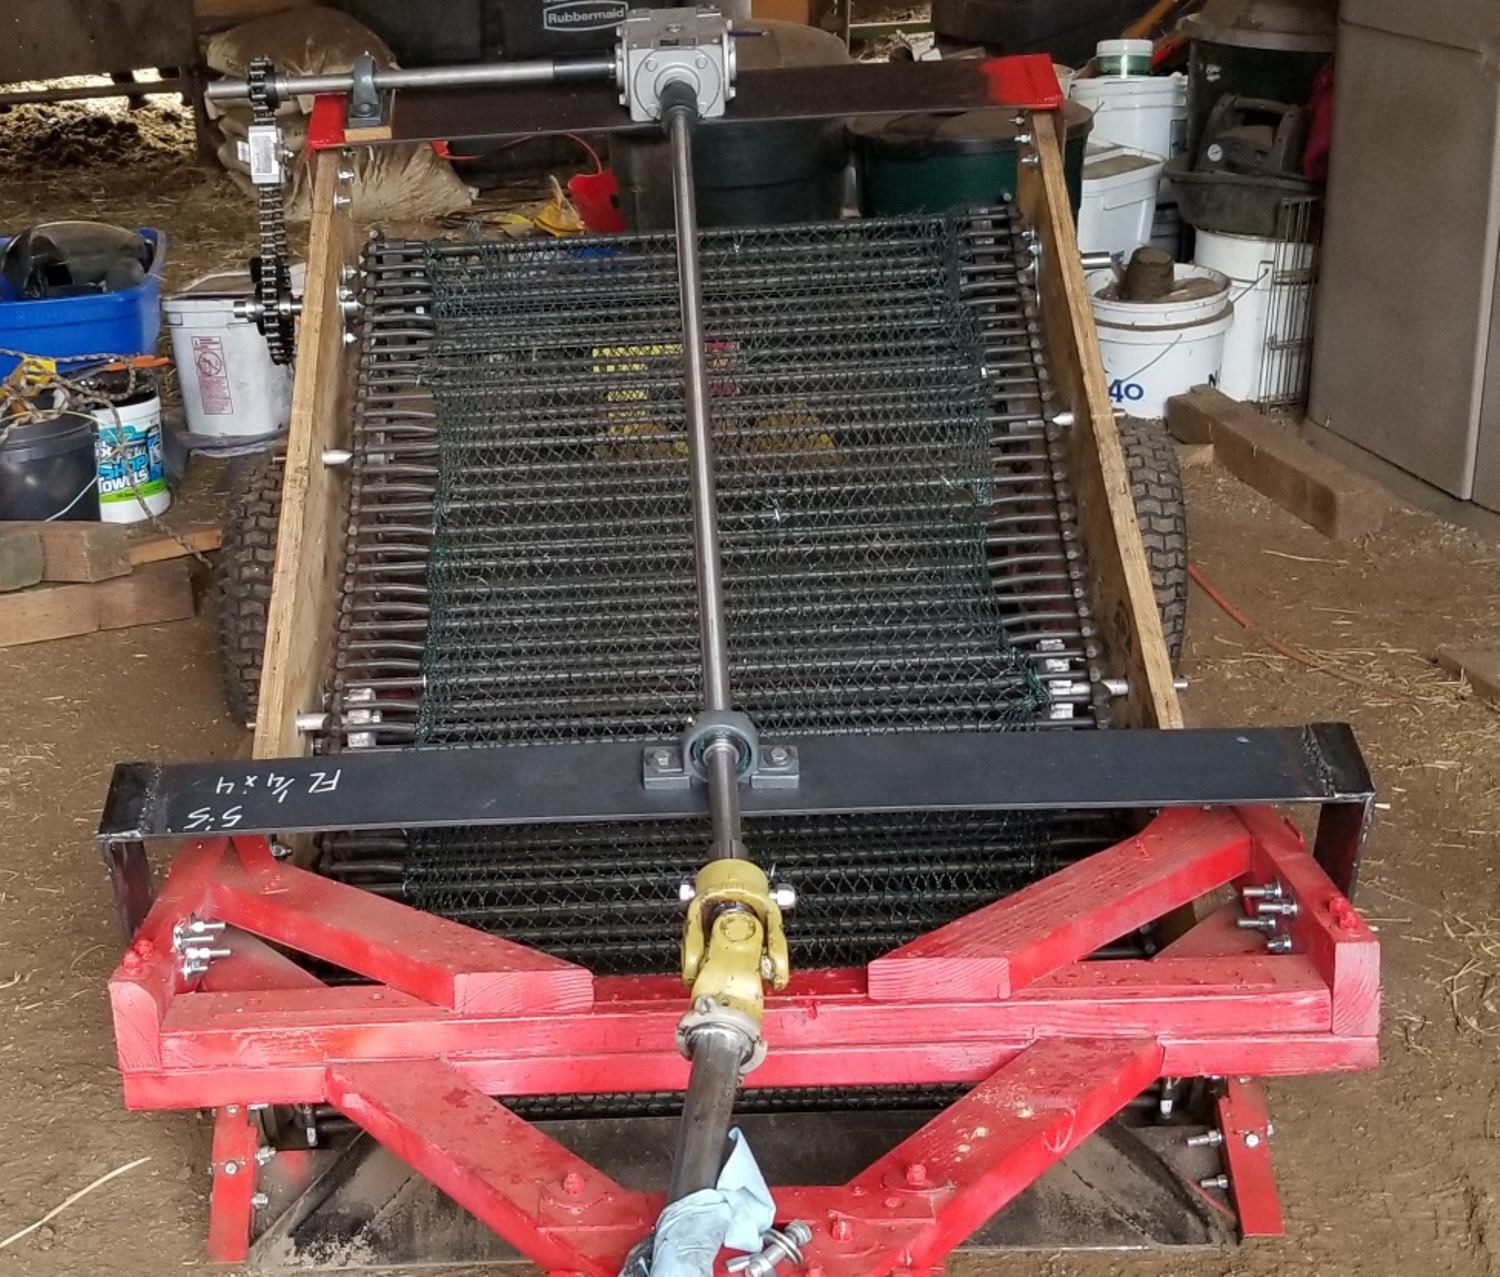
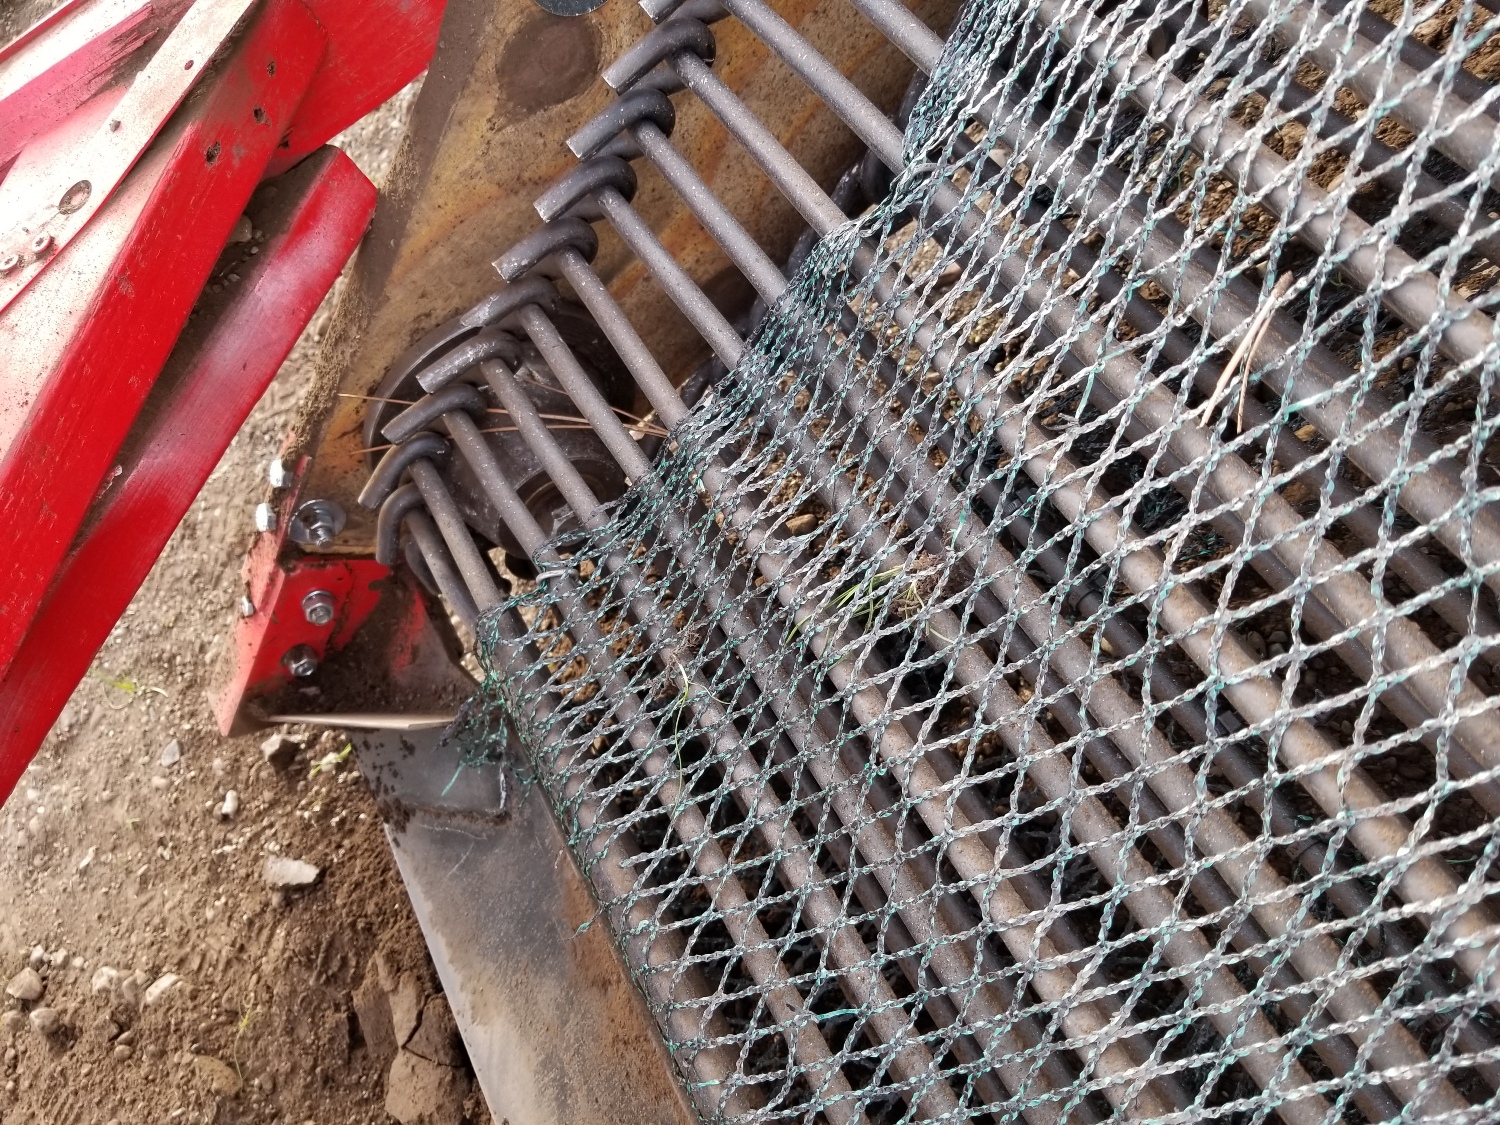
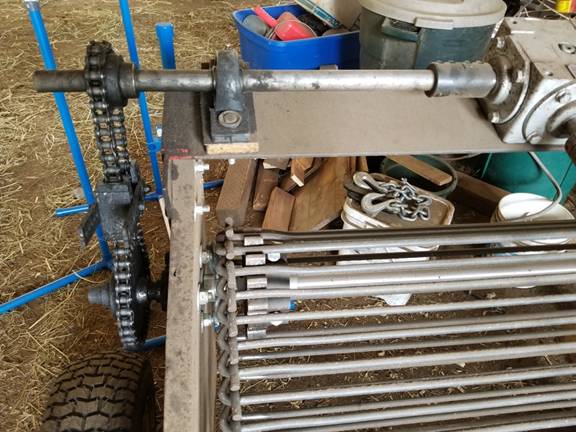
The three key parts are (1) the hook chain conveyor belt, (2) the commercial bird netting over the hook chain, and (3) the PTO drive off the tractor which is very robust.
My "How to Build It" writeup is at the bottom of the page. FYI when I finally got a working machine, I added up the costs of all the parts in just the final machine (not including everything I spent on all the failed prototypes) and it came to just under $4000. Not inexpensive, but definitely less expensive than a lot of what's available for sale. And I'll be using it every spring forever, so not a bad investment.
This is my arena rock picker at work:
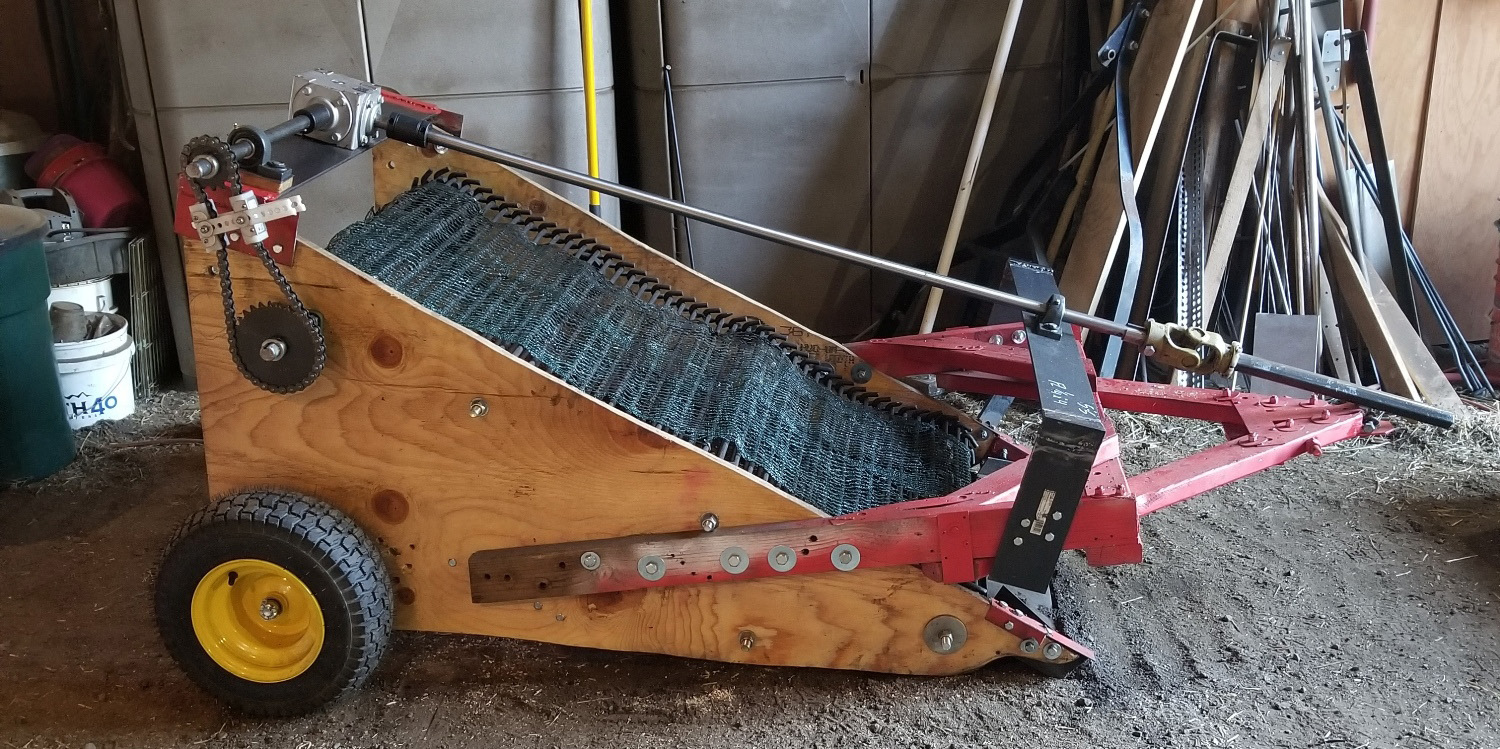
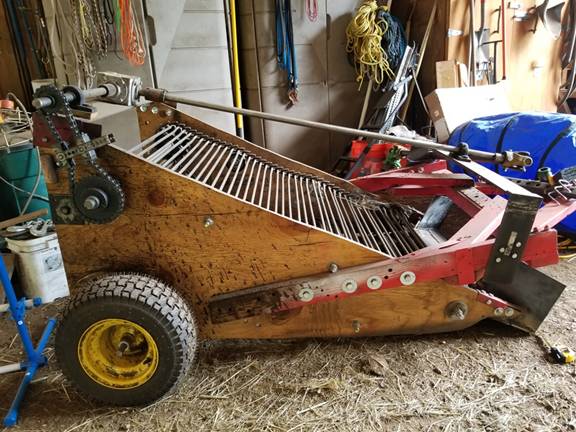
Side view, sitting in the barn
|
|
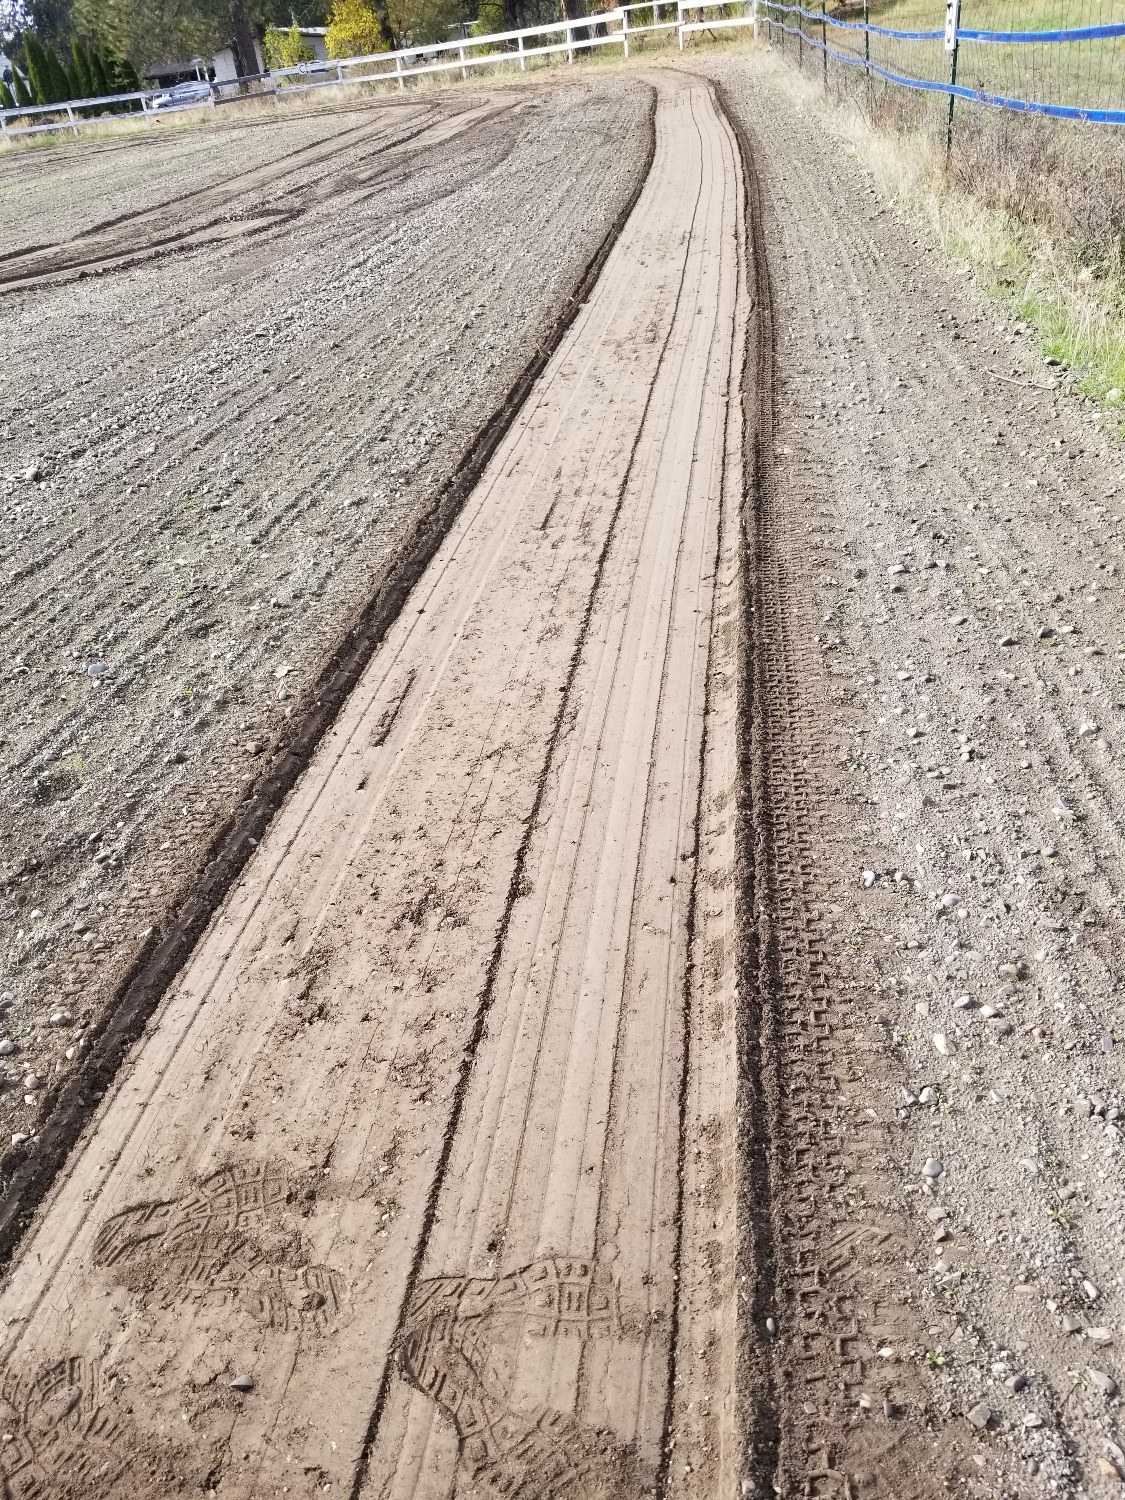 Cleaned path. Cleaned path. |
 Dragging a full stone boat to the rock pile. Dragging a full stone boat to the rock pile. |
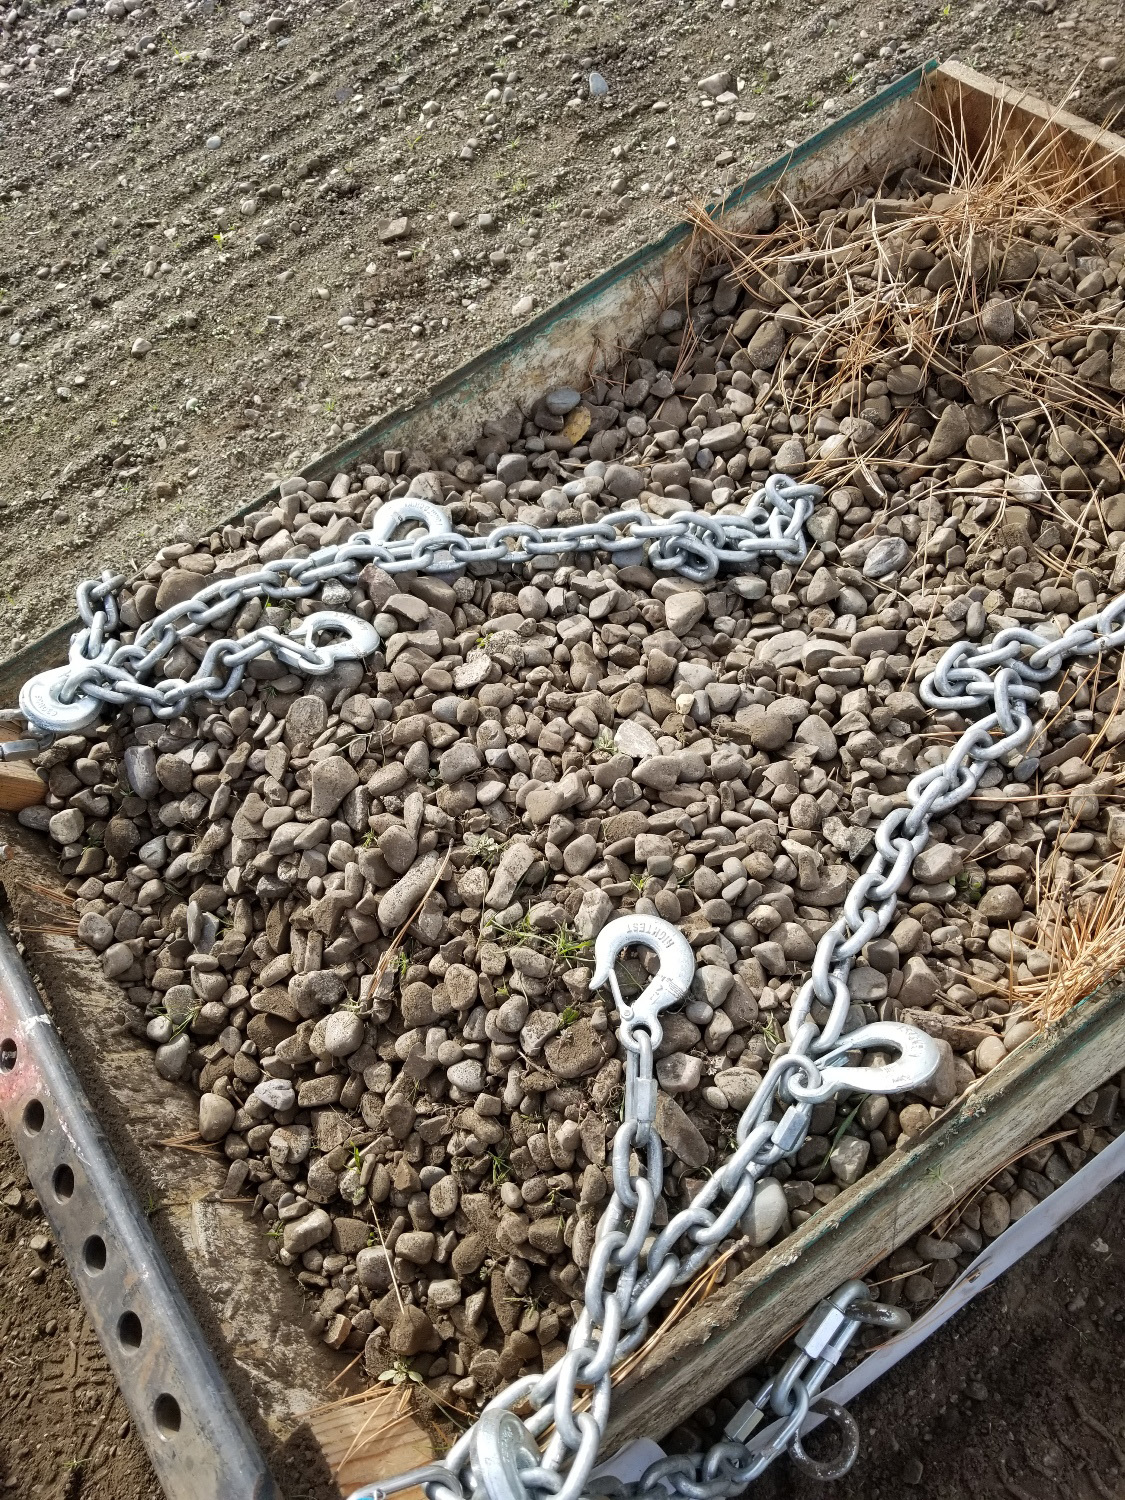 Stone boat full of cleaned rocks. Stone boat full of cleaned rocks. |
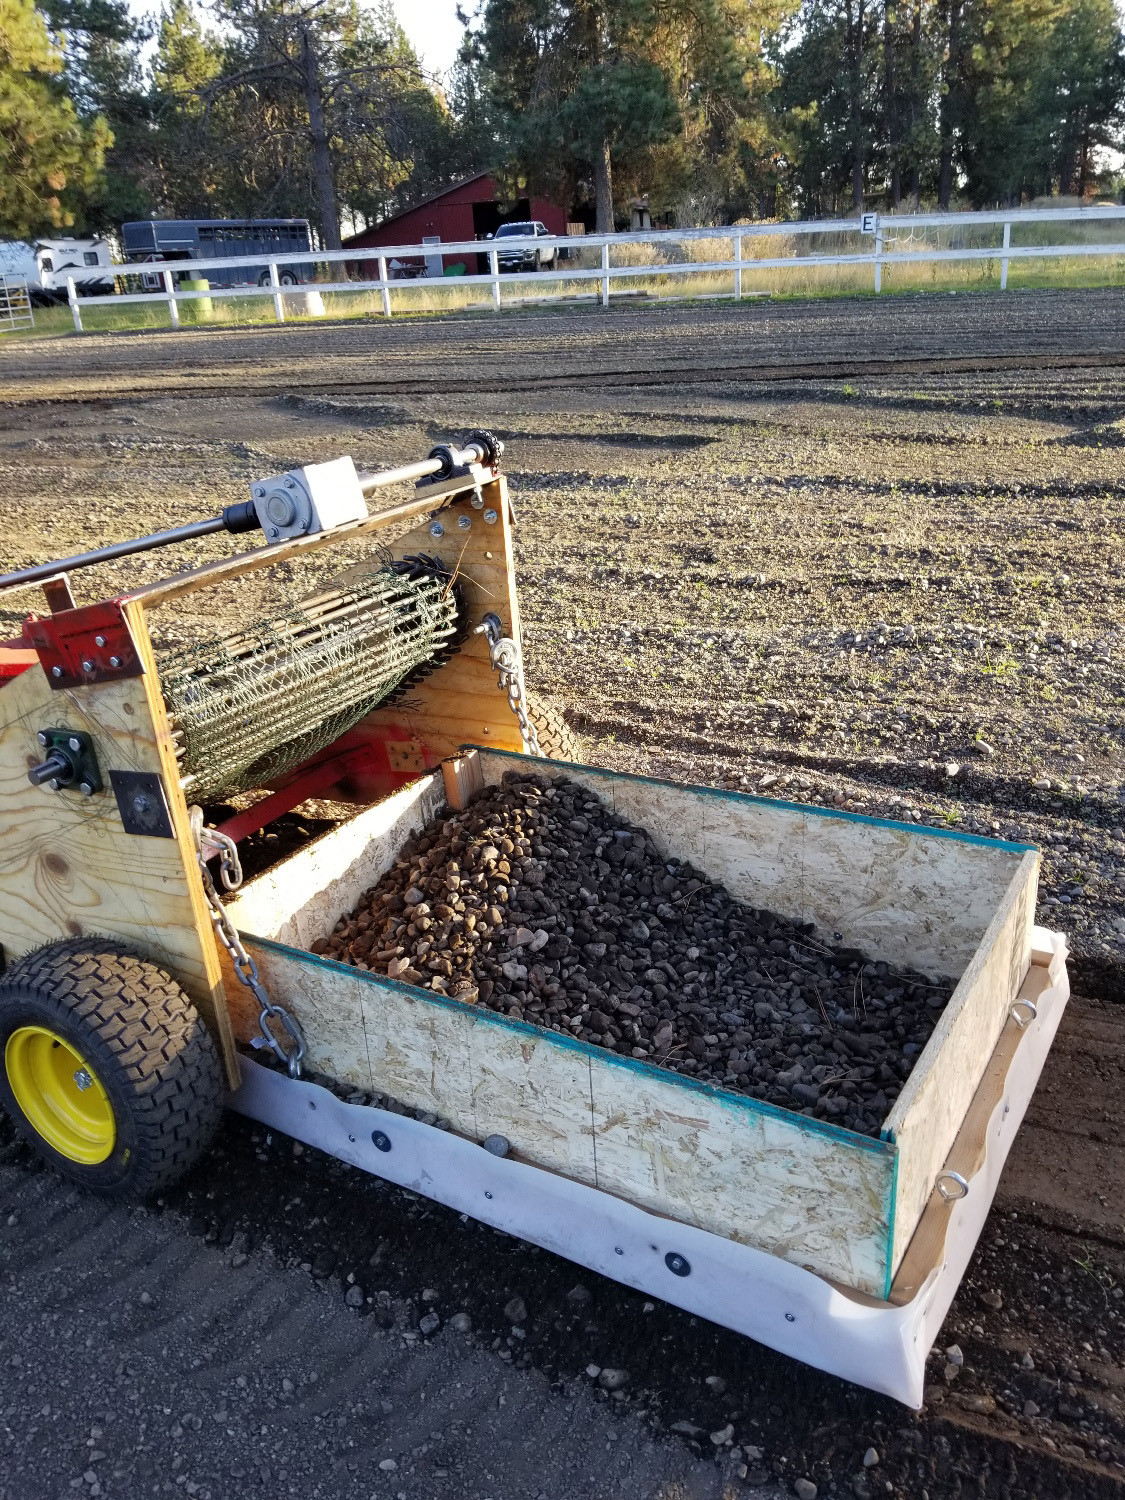 Picker pulling the stone boat, attached with chains and hooks. Picker pulling the stone boat, attached with chains and hooks. |
 |
 |
 |
 |
 |
 |
How to Build It
Friends keep asking if I’ll build my rock picker for other people, or to sell it, and the answer is “I just don’t want to”. It was a lot of work and I don’t really want to do it again. This guide to building your own version of my rock picker will work if you are fairly handy with tools and hardware and welding and farm equipment. I’m going to list the parts and sources, the most important specs, and any tips I remember to make it easier.
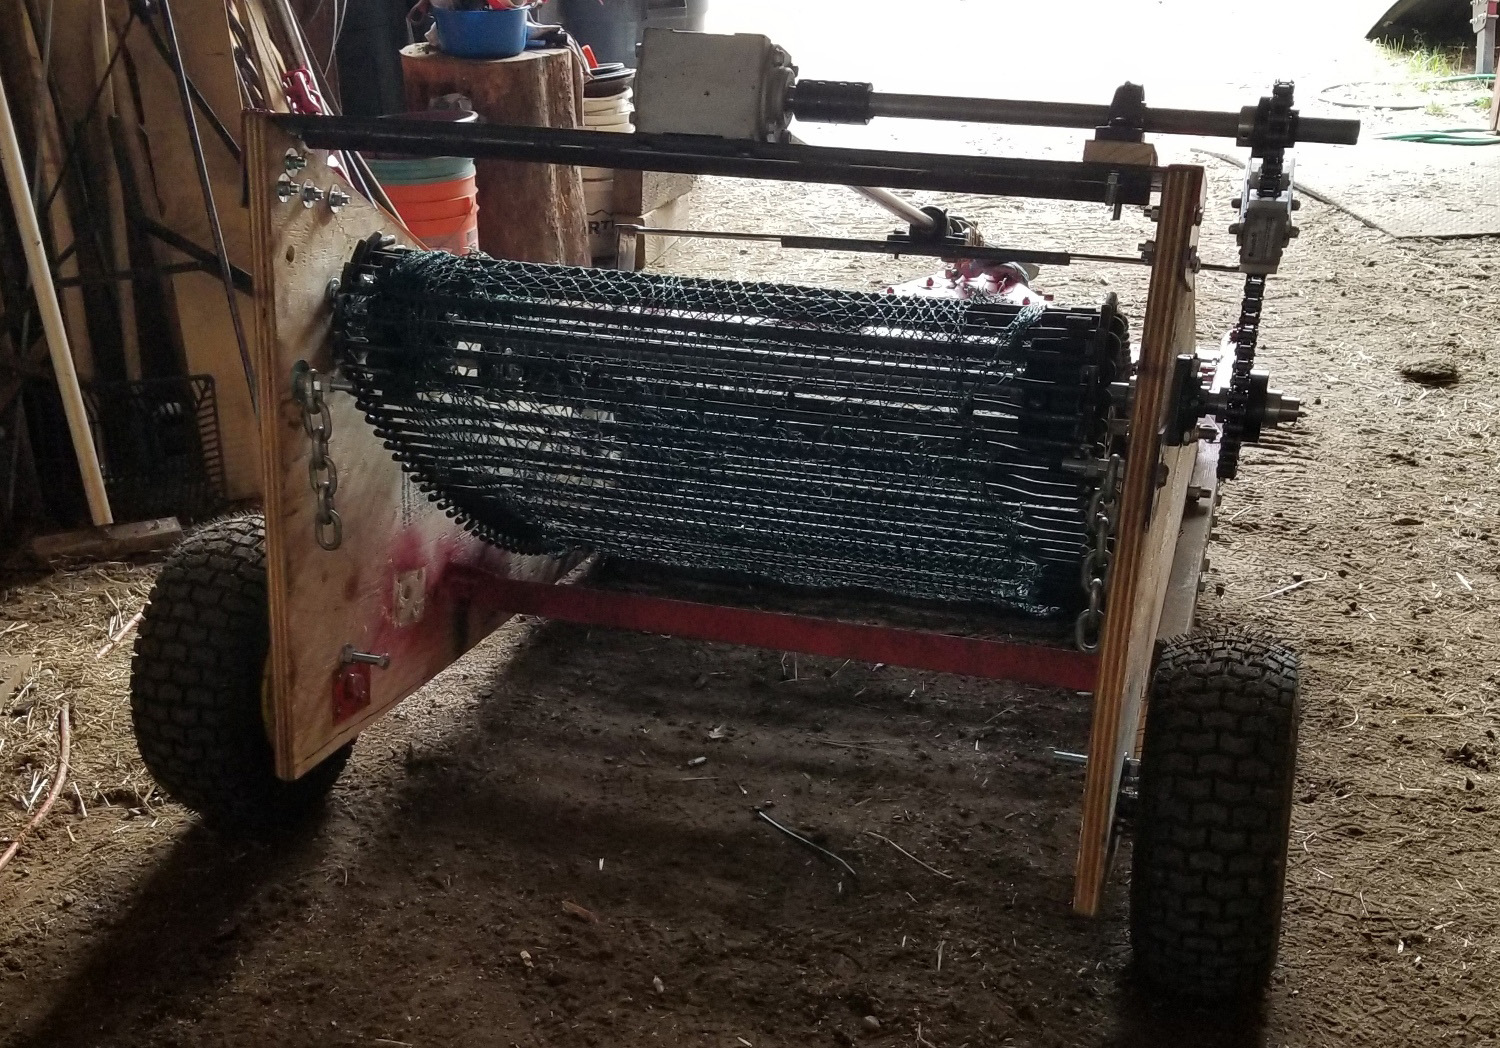
This is my final (and finally working) prototype – I built it with plywood sides and 2x4 lumber for pulling arms, the plan being that once it worked reliably and I had all the angles and measurements perfect I would have it fabricated in farm-grade metal. Now that it is working so fabulously well I don’t want to take it apart to rebuild it in metal until the wooden parts of it begin to fall apart (if it’s not broken, don’t fix it, right?). So what I’ll describe is a mostly wooden final prototype.
The details and resources are here, but it’s not a step by step and you’ll probably still need to do some layout and planning. I didn’t include exact measurements. I can’t find overall measurements at the moment, but I can tell you that I used the www.calculator.net right triangle calculator a lot, and according to the pictures I saved of various right angle calculations (to get that 23 degrees) my right triangle measurements are about a=25”, b=60” and c=65”.
The width between the sides at the back, to fit the stone boat, is a little wider than the width of my hook chain – 38”.
The length of your picker will be determined by the length of your hook chain conveyor (and the conveyor should not be tight – it should have a good drape underneath).
You’ll figure it out.
I’m planning on rebuilding mine this summer using steel C-channel instead of plywood for the side frames. A rented plasma cutter and more welding! YAY! I am so looking forward to that! I think I’ll try to video the process and post that when it’s done. You may well study this how-to and figure out a better way to do things, which is how invention supposed to go. Start with my idea and make it better. And then let me know what you did!
Enjoy, and if anything really makes no sense, feel free to ask.
PS It is TOTALLY FUN to run this picker and watch it pick up rocks!!!
The most important specs are:
- The angle of incline for the conveyor belt is no more than 23 – 24 degrees.
- The diameter and mounting of the tires control the angle of incline (bigger tires will make it too vertical).
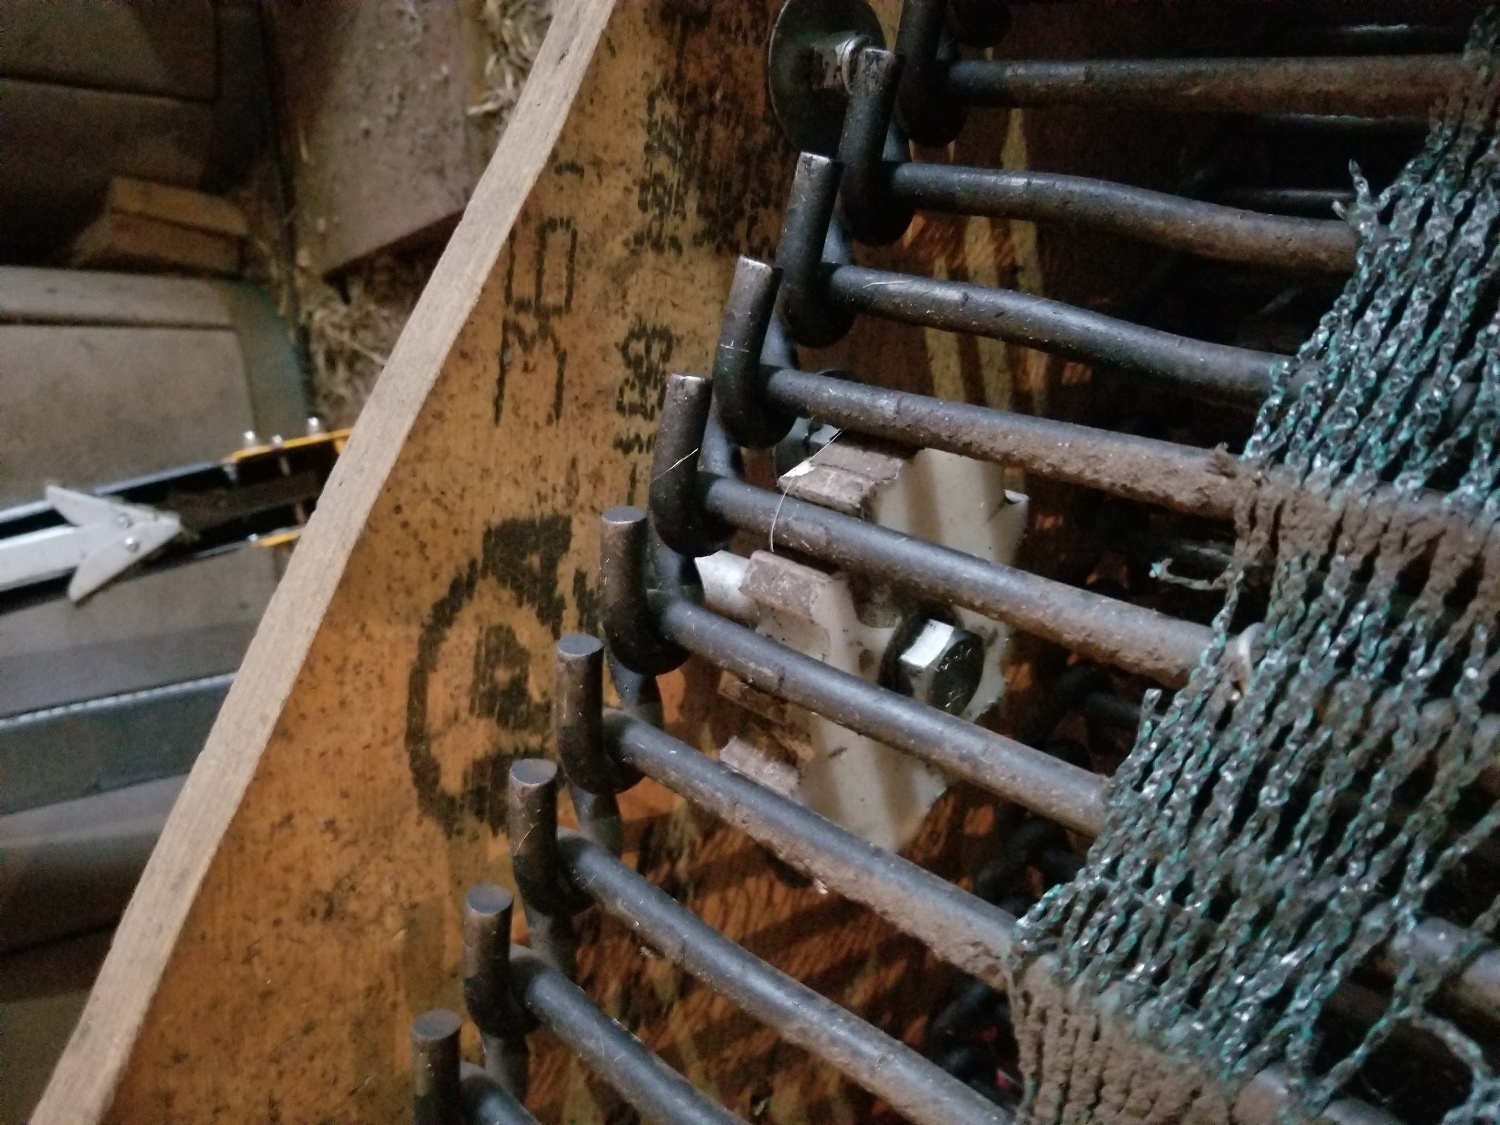
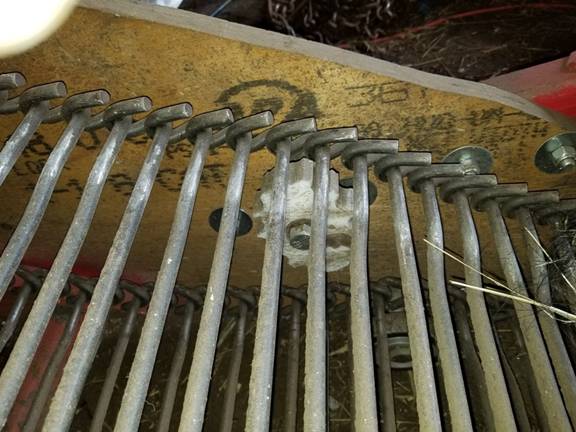
- The hook chain conveyor belt is critical. It will catch rocks larger than 1”. I covered it with a professional grade bird netting to catch rocks down to ½”.
- The PTO drive from the tractor made all the difference in making it functional. The speed of the conveyor is controllable without being affected by the ground speed of the tractor.
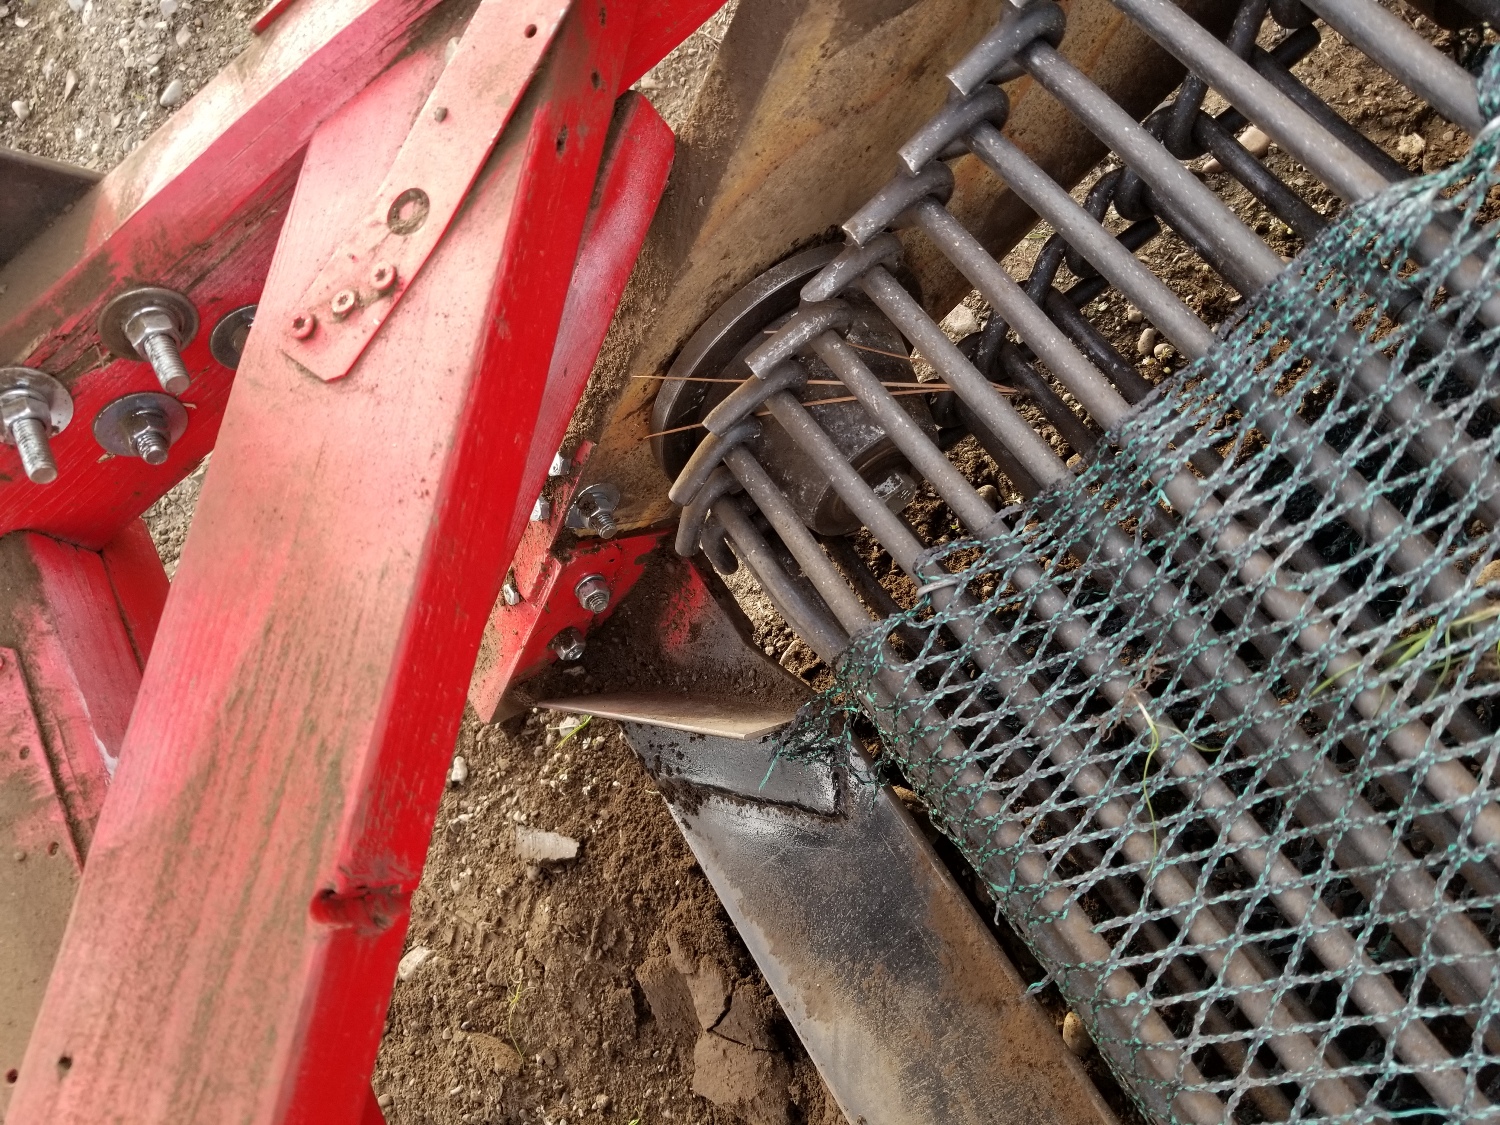
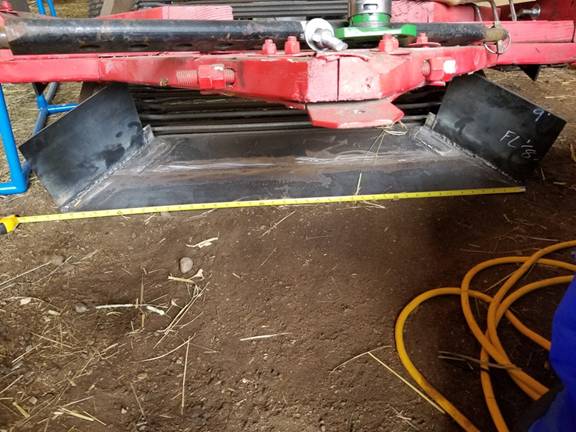
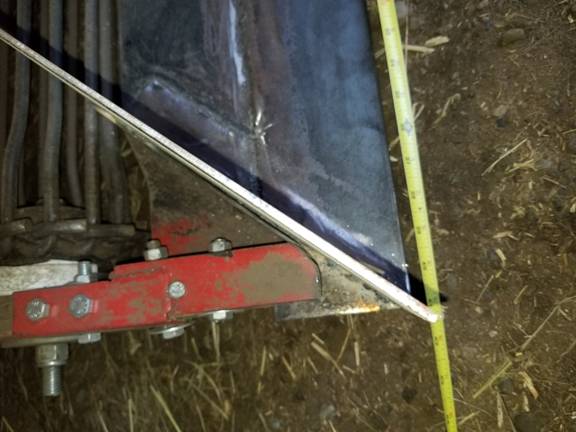
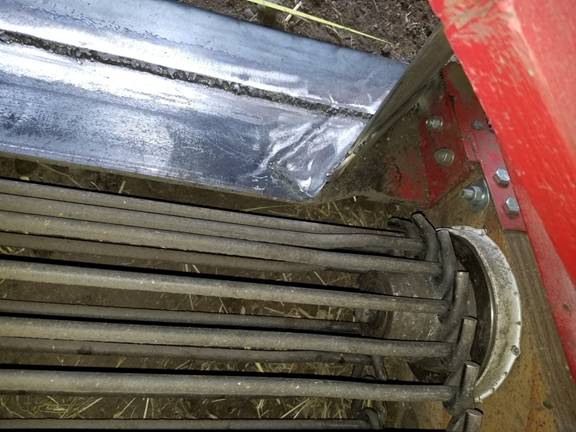
- Digger tooth – ½” steel plate, 9” by 41” (or the full outside width of the picker). Blade should be at same angle as hook chain belt, set to meet the belt at or just below the centerline, and cut out at the sides so it sits no more than one inch from the hook chain rods but cut away from the hooked ends of the rods on each end. See pics at end of article. My first digger blade was 6” wide, short enough to not pile up too much dirt, but it only dug 1” deep. You’ll notice I welded on an additional 4” blade to bring the blade depth to 9”, and expanded it out to 41” (the full width of the picker). I also welded on a vertical fin on each end to guide the dirt into the center of the hook chain rather than allowing it to pile up on the side nose rollers.
Parts and sources:
- Hook chain and rollers – from Noffsinger Manufacturing. I ordered a length of hook chain conveyor that is 36” wide, 7/16” rods, 1.25 pitch, 2 drive sprockets (1” bore for shaft), 2 nose rollers for bottom, and 4 rollers for midway support. I ordered the minimum length they manufacture (I think it was 100 rods) which came out to about 100” (maybe 110”), which determines the length of the picker.
- I added two homemade shaker rollers (cut on a bandsaw from a 1” thick HDPE cutting board from Amazon) which make the dirt and sand fall through MUCH better, even when the dirt is damp.
- Professional grade bird netting from Amazon - Bluefire brand Commercial Grade Heavy Duty Polyethylene Anti Bird Netting (13 ft x 16.5 ft)
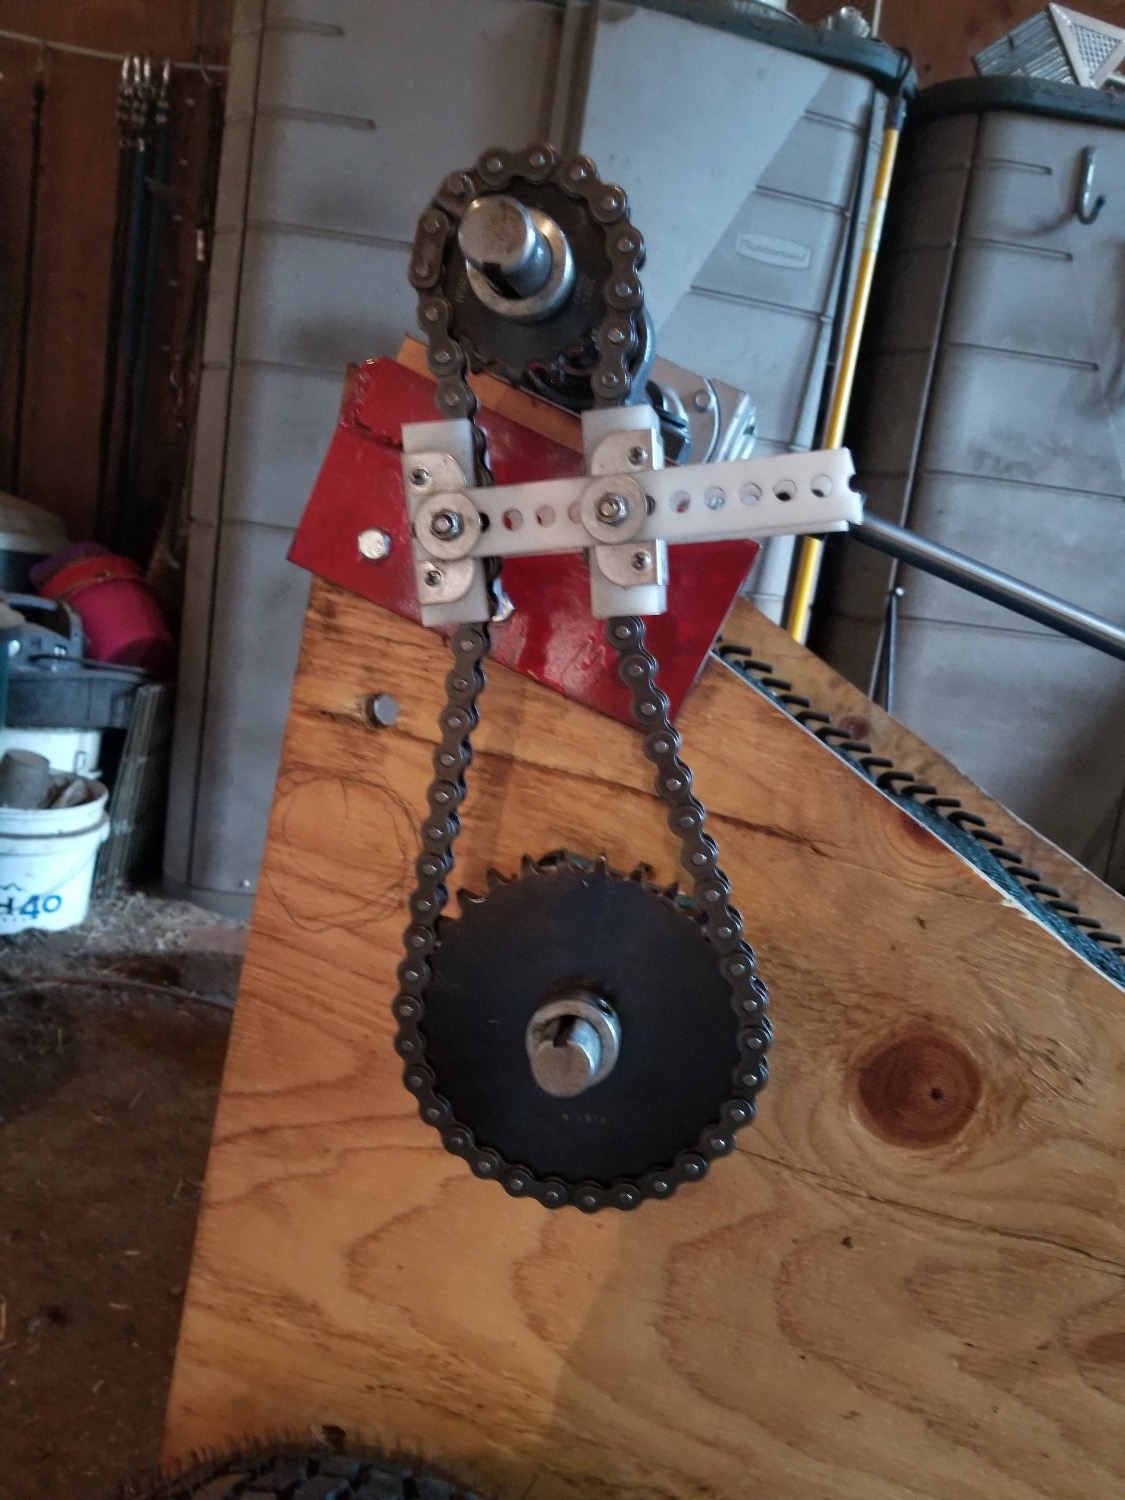
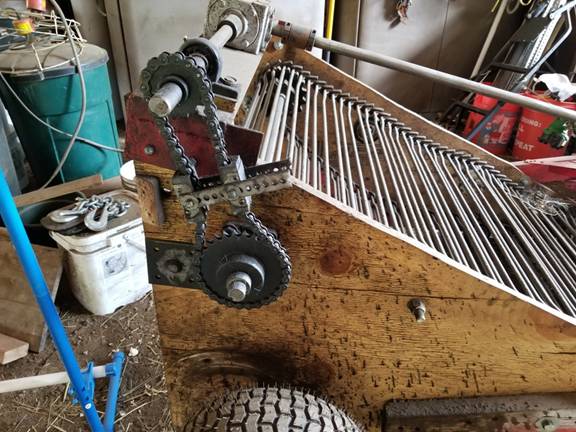
- Right-angle gearbox from EBay – make sure both gears turn the direction you want. My tractor PTO turns the front gearbox shaft CCW, which turns the left-side gearbox shaft CCW, which turns the sprocket and conveyor belt axle backwards.
- 2 drive sprockets and drive chain – 50 pitch (I might upgrade to 60 pitch in the next iteration) – the drive sprockets are both 1” bore. The top sprocket (the one mounted on the gearbox shaft) is 15 teeth and the bottom sprocket (mounted on the conveyor shaft) is 29 teeth. It’s important that the sprockets have an uneven number of teeth to reduce wear on the chain, and the ratio of 15T top:29T bottom cuts the drive speed in half. Be sure you use the low speed setting (max 540) on the tractor PTO. I got the sprockets and chain at McGuire Bearing, a hardware store in Spokane, WA, but you can also get them from McMaster hardware online.
- Drive chain floating tensioner – the only kind that works in this setting (and yes, you need it). The one I'm using is sized for #40 chain, and they don’t make them for larger chain, but it seems to be working on the #50 chain so far. Get it from McMaster.
- Self-aligning pillow block bearings – two 4-bolt inset bearings for mounting the conveyor belt shaft through the sides of the picker, and two upright bearings for mounting the PTO and sprocket drive shafts. Get them from McMaster or your local bearings and equipment store.
- Three keyway milled shafts, fully milled keyways (standard 1/4x1/8) all the way across, 1” diameter, hardened carbon steel, one for the top of the conveyor belt (48” long), one for the gearbox to sprocket (18” long), and one for the gearbox to PTO shaft (60” long).
- Several 5/8” , ½”, and ¼” bolts of various lengths.
- A spare (or new) PTO drive shaft for permanent connection to the rock picker
- An expensive item that makes the constant connecting/disconnecting the PTO shaft from the tractor a lot easier and faster is a John Deere Quik Knect connector (or similar other brand, but I have a John Deere tractor).
- Plywood – for sides – 1 full sheet 1-1/8” flooring
- 2x4 for building the arms – do whatever seems sturdy to you – mine are probably overbuilt – look at the pictures.
- Thick metal tongue under the front V of the pulling arms for attaching to the drawbar of the tractor – I use a ½” bolt with two washers and a wing nut to attach the drawbar to the metal tongue for pulling.
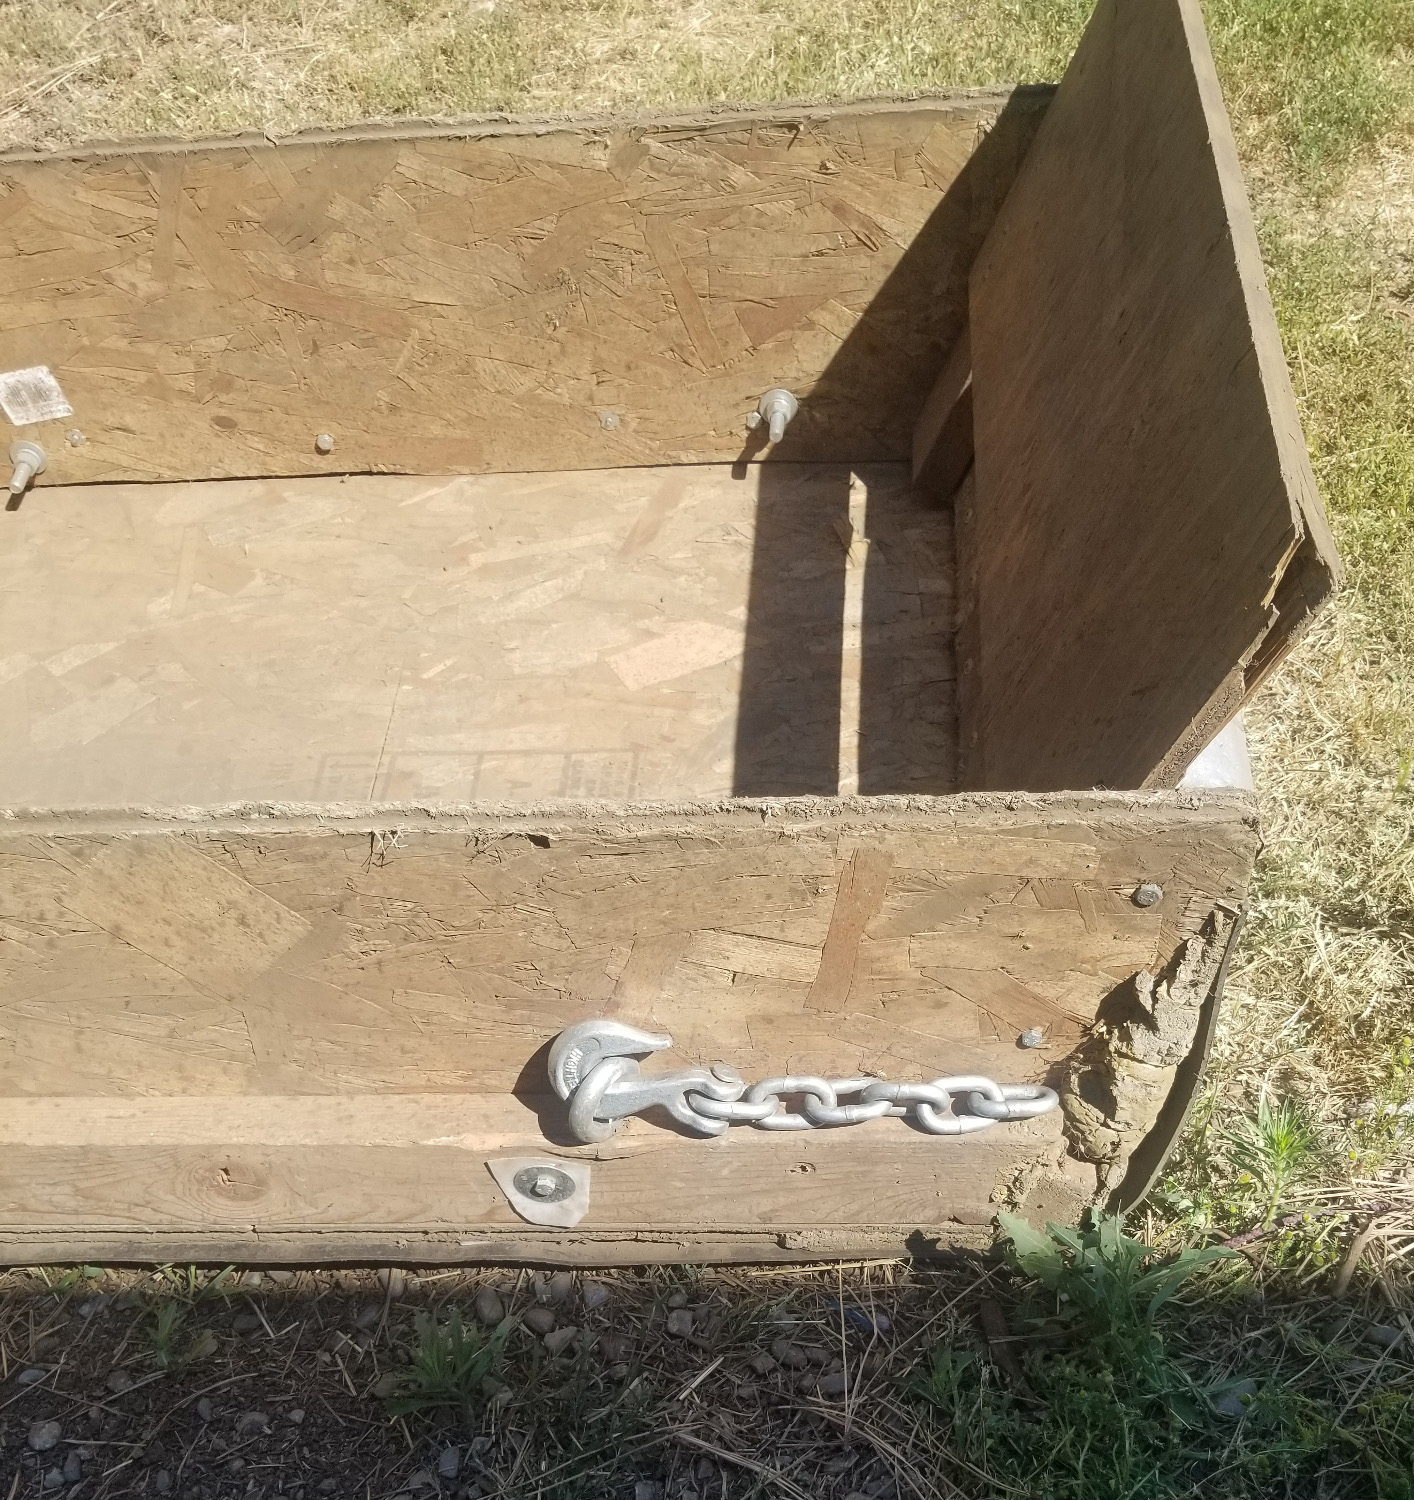
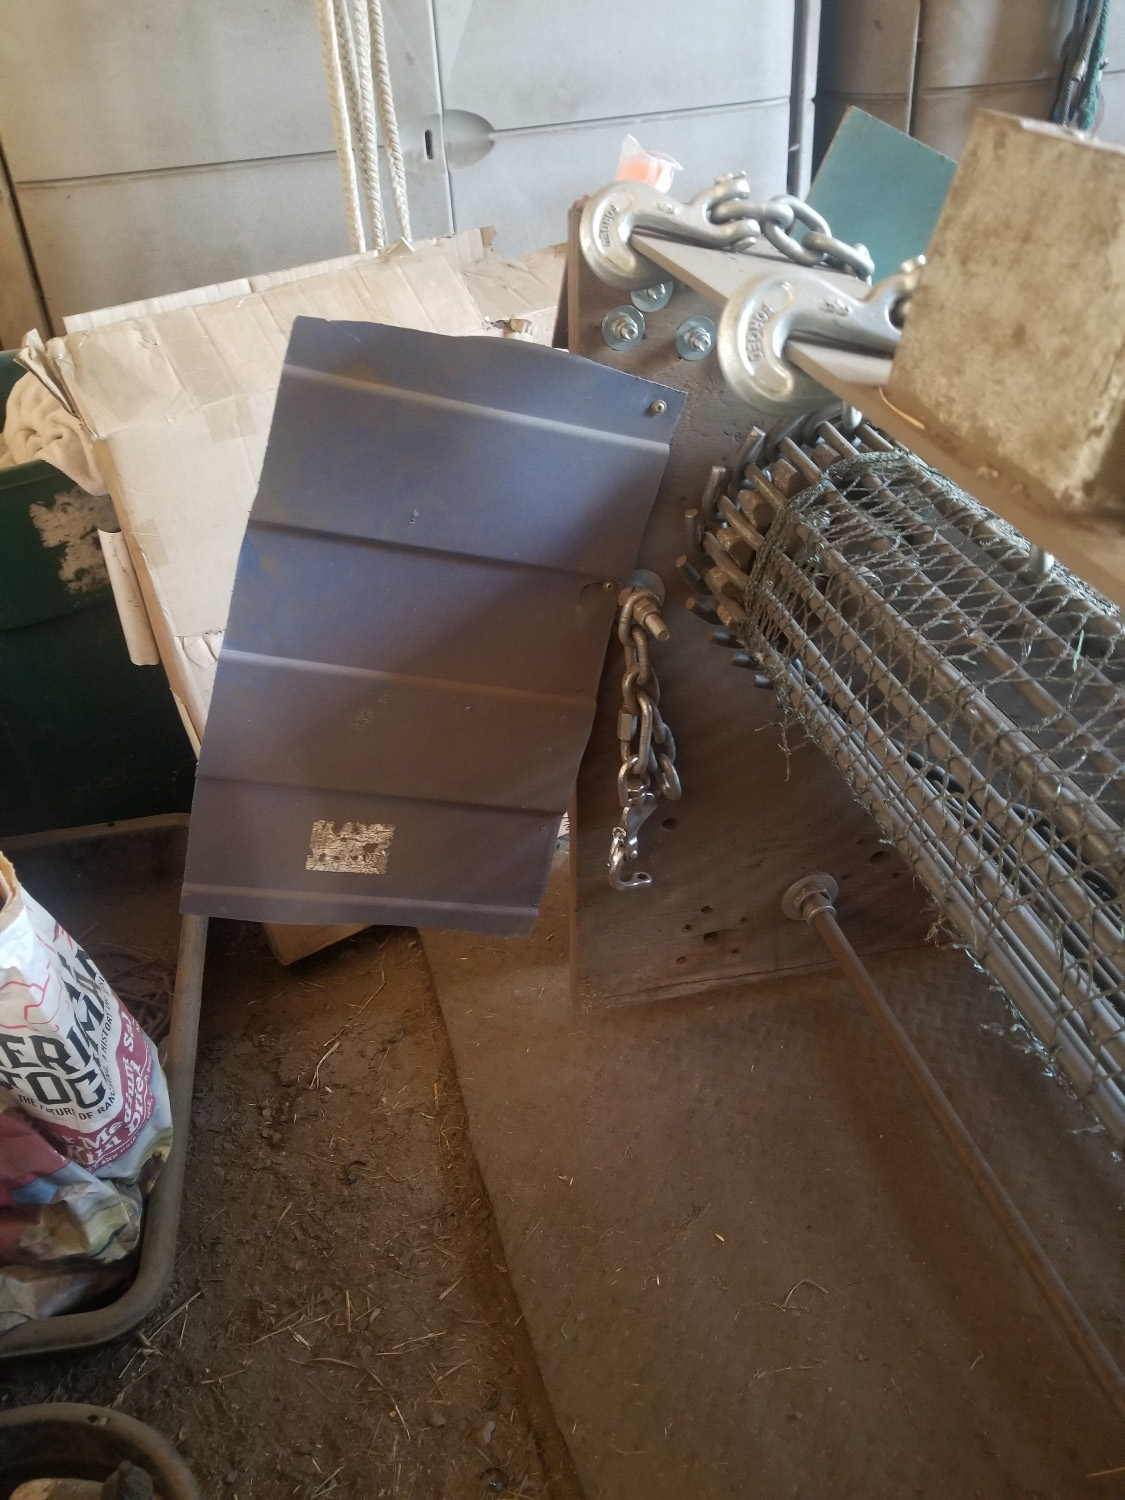
- Chains and hooks and eyebolts and quick-disconnects for pulling the stone boat behind the picker and for pulling the stone boat behind the tractor to the rock pile and for picking up the side of the stone boat to turn it over and dump it. All chain and hook hardware should be ½” and rated for as high a max weight as possible. This should be overbuilt.
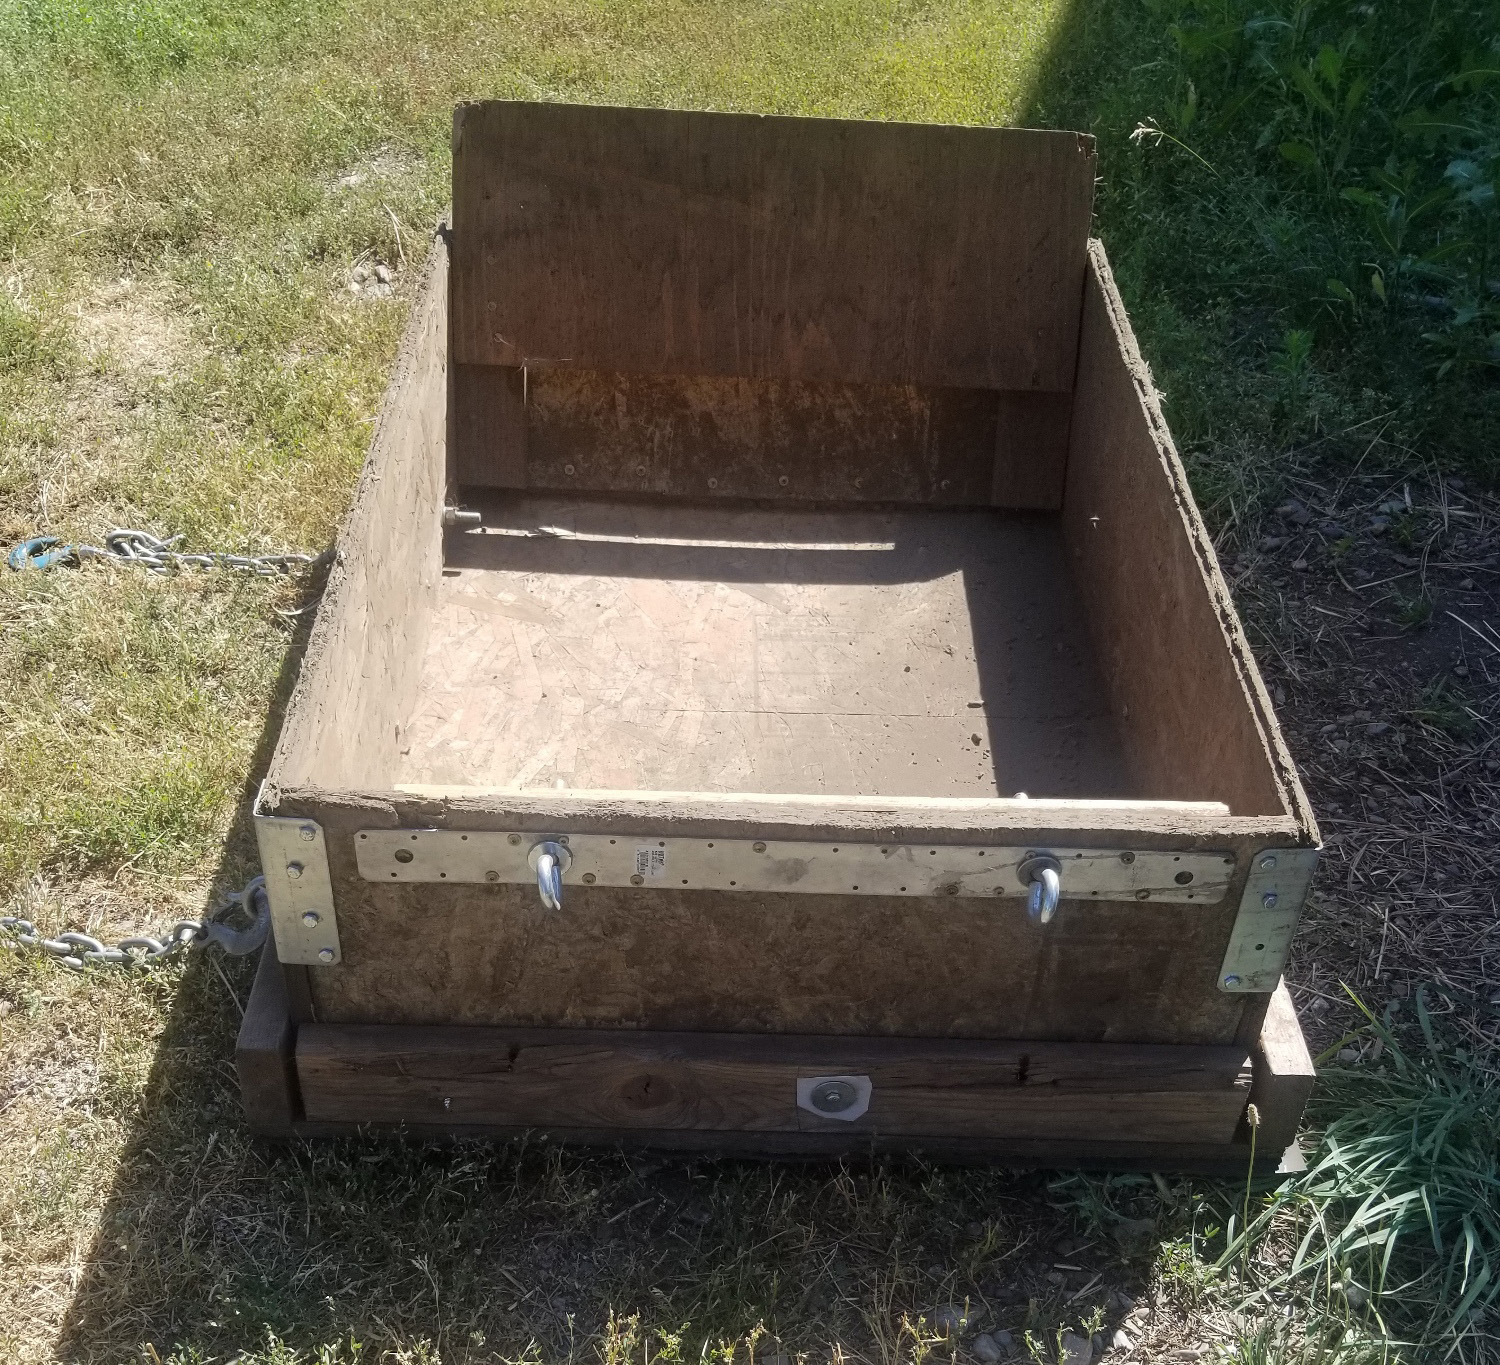
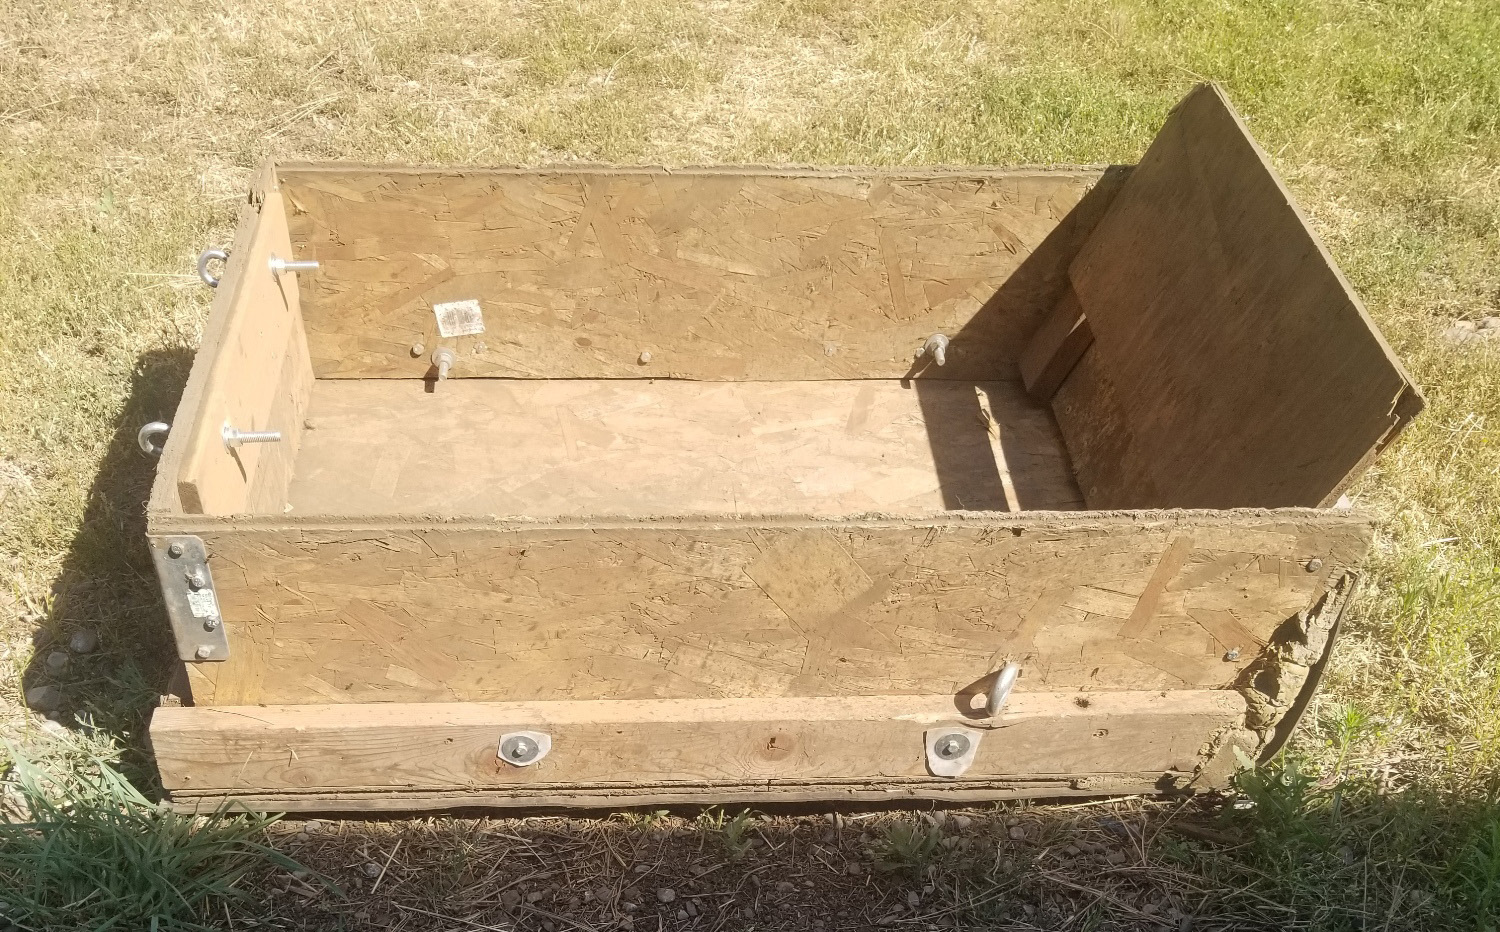
Stone Boat
- A plywood box as long as you want, no wider than will fit between the sides of the picker. Make the front of the stone boat box angle upwards forwards. Screw 1/8” HDPE sheet on the bottom and bend it up the front of the stone boat (use a heat gun to soften and bend it) so the box will slide smoothly over whatever you drag it over. Get this from a plastics fabricator.
- Hook the stone boat to the picker such that the front edge catches the rocks coming over the conveyor belt but doesn’t catch any of the dirt that shakes through. Use quick-disconnects to make disconnecting the full and very heavy stone boat from the chains on the picker easy.
- My build on the stone boat is not included here - I apologize - I'll try to do that soon. Meanwhile you need to use the description and pictures to figure out how to collect and move the picked rocks.
Procedure
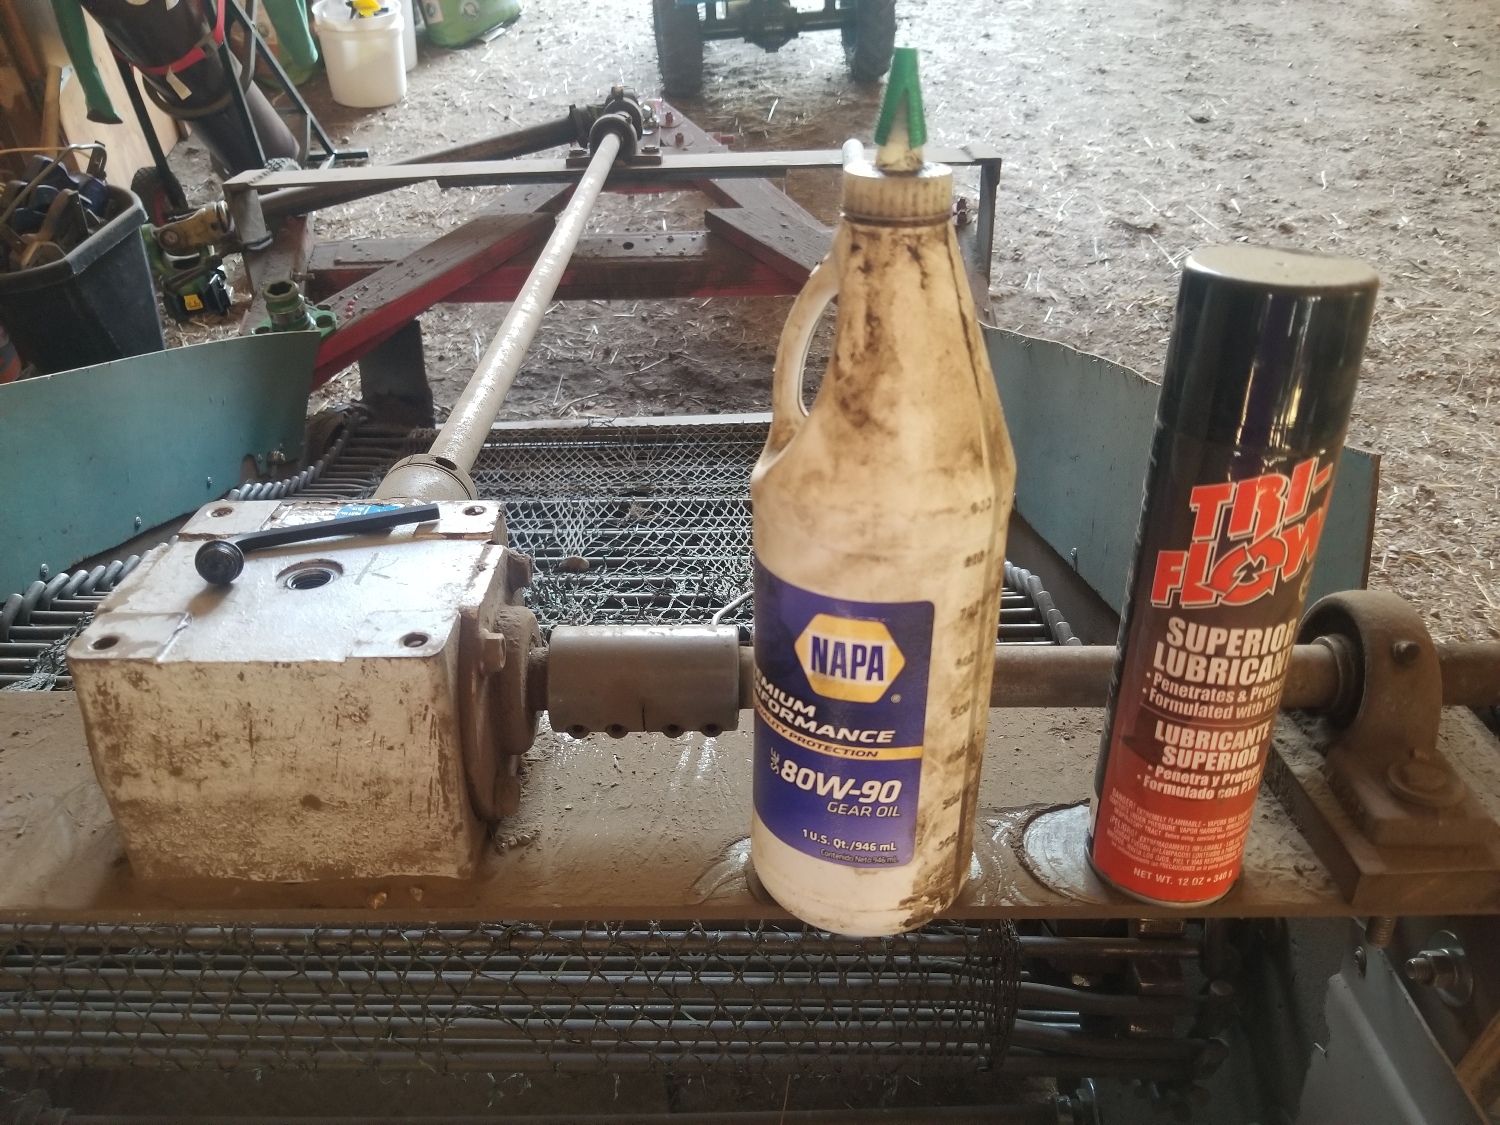
- Every time you use it: Fill the gear box with oil (80W-90 gear oil) and liberally spray lube the drive chain.
- Pull the picker into the arena.
- Pull the stone boat near the back end of the picker and slide it forward and hook it up (it should be light when it’s empty).
- Drive the tractor to the front and back it up to the picker. Hook up the picker and the PTO shaft.
- Lower the digger tooth blade onto the dirt.
- Start the PTO turning – be sure you are in the low range (max 540 rpm) and start it slowly, then gently pick up the speed. The conveyor should turn at twice ground speed travel.
- Start the tractor forward slowly. Watch what’s happening over your shoulder. If the dirt builds up too deeply at the digger blade, slow down or slightly increase the PTO speed or pick up the digger blade slightly. Play with it to figure out what works. Dry dirt will be a lot different than damp dirt – don’t try to run it in very damp or wet dirt because you’ll pick up too much dirt that won’t shake through.
- The stone boat will fill up in front first – you’ll want to stop and use a hand garden fork to pull the rocks to the back of the box and then do some more picking.
- When the stone boat is full, stop everything. Disconnect the stone boat from the picker, raise the picker blade, and pull the picker forward enough to get the tractor in front of the stone boat and hooked up for pulling out. (later I added eyescrews to the back of the stone boat so I could pull it from the back – it’s faster that way).
- Pull the stone boat to your rock pile and disconnect it. Bring the tractor around to the side of the stone boat and connect the side eyescrews to the chains to the tractor loader bucket. Slowly raise the loader bucket to pick up the side of the stone boat and dump it. Then set it back down and disconnect and reconnect for pulling.
- Pull the stone boat back into the arena near the back of the picker, hook everything up again, and pick more rocks.
Front digger blade (or tooth) with fins to angle the dirt feed toward center
Front digger blade, starboard side
Side view – the critical angle of 23 – 24 degrees on the conveyor belt is formed by the triangle from lower sprocket to edge of digger blade to bottom of wheel.
The wheels have ¾” bearings so they can be mounted on a stationary axle and turn on their own bearings.
The axle is heavy – it carries a lot of weight – and this one is a 1” diameter rod that I necked down to ¾” on each end using a DIY metal lathe (a very big, heavy, borrowed 3/4” drill, a couple of supports for the rod, and an angle grinder with a coarse buffer wheel – the first end was ground with the 1” end held in a ¾ to 1 step down connecter from McMaster hardware (expensive for a one-time use) with a short piece of ¾ mounted in the drill while I ground the other end down, then flipped it and put the newly ground end in the drill and ground down the second end).
The castling (the two raised supports for the right-angle gearbox at the top and the bearing holding the PTO shaft near the bottom) are welded and bolted on ¼ steel plate that you have to measure for yourself on your machine – be sure the angles work so the PTO shaft can turn freely.

The green item is a John Deere Quik Knect, that enables really fast connection/disconnection of the PTO shaft to the tractor PTO drive.
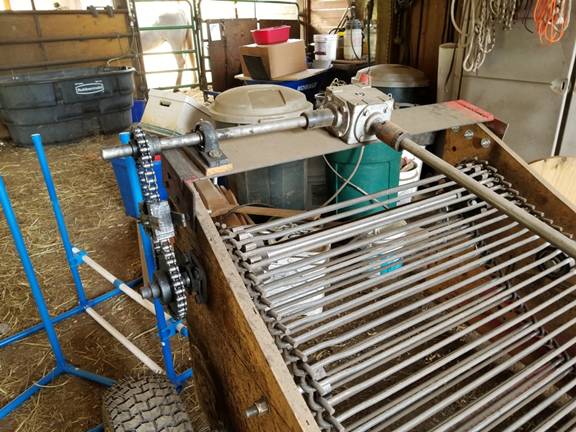
The upper castle with the right-angle gearbox, driving the top sprocket, which drives the bottom sprocket, which drives the cast iron sprockets that turn the hook chain belt. The cast iron sprockets are custom made to match the hook chain belt and come with the hook chain when you order it. They must be mounted on a fully keyed shaft so they will be completely symmetrical in use.
Two sprockets, chain, and floating tensioner
Front view of the upper drive setup – I add oil to the gearbox and liberally spray lube the chain every time I use it.
One of the pair of my homemade shaker rollers.
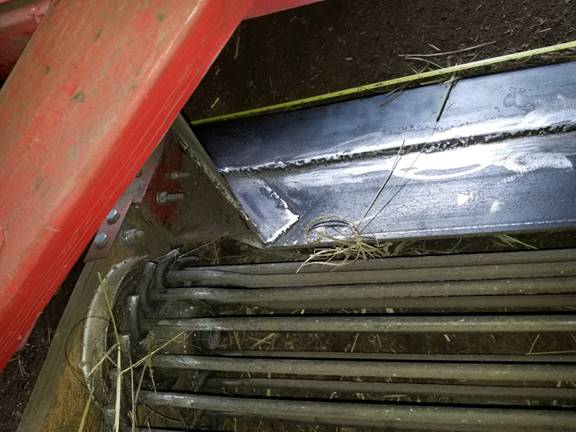
A nose roller and the short cutout at each side of the top edge of the digger blade to miss the hook chain side hooks.
The other nose roller – the white “sleeve” is just a piece of plastic yogurt container I put over the space between the nose roller and the plywood to stop it from catching small/tiny gravel and rocks.
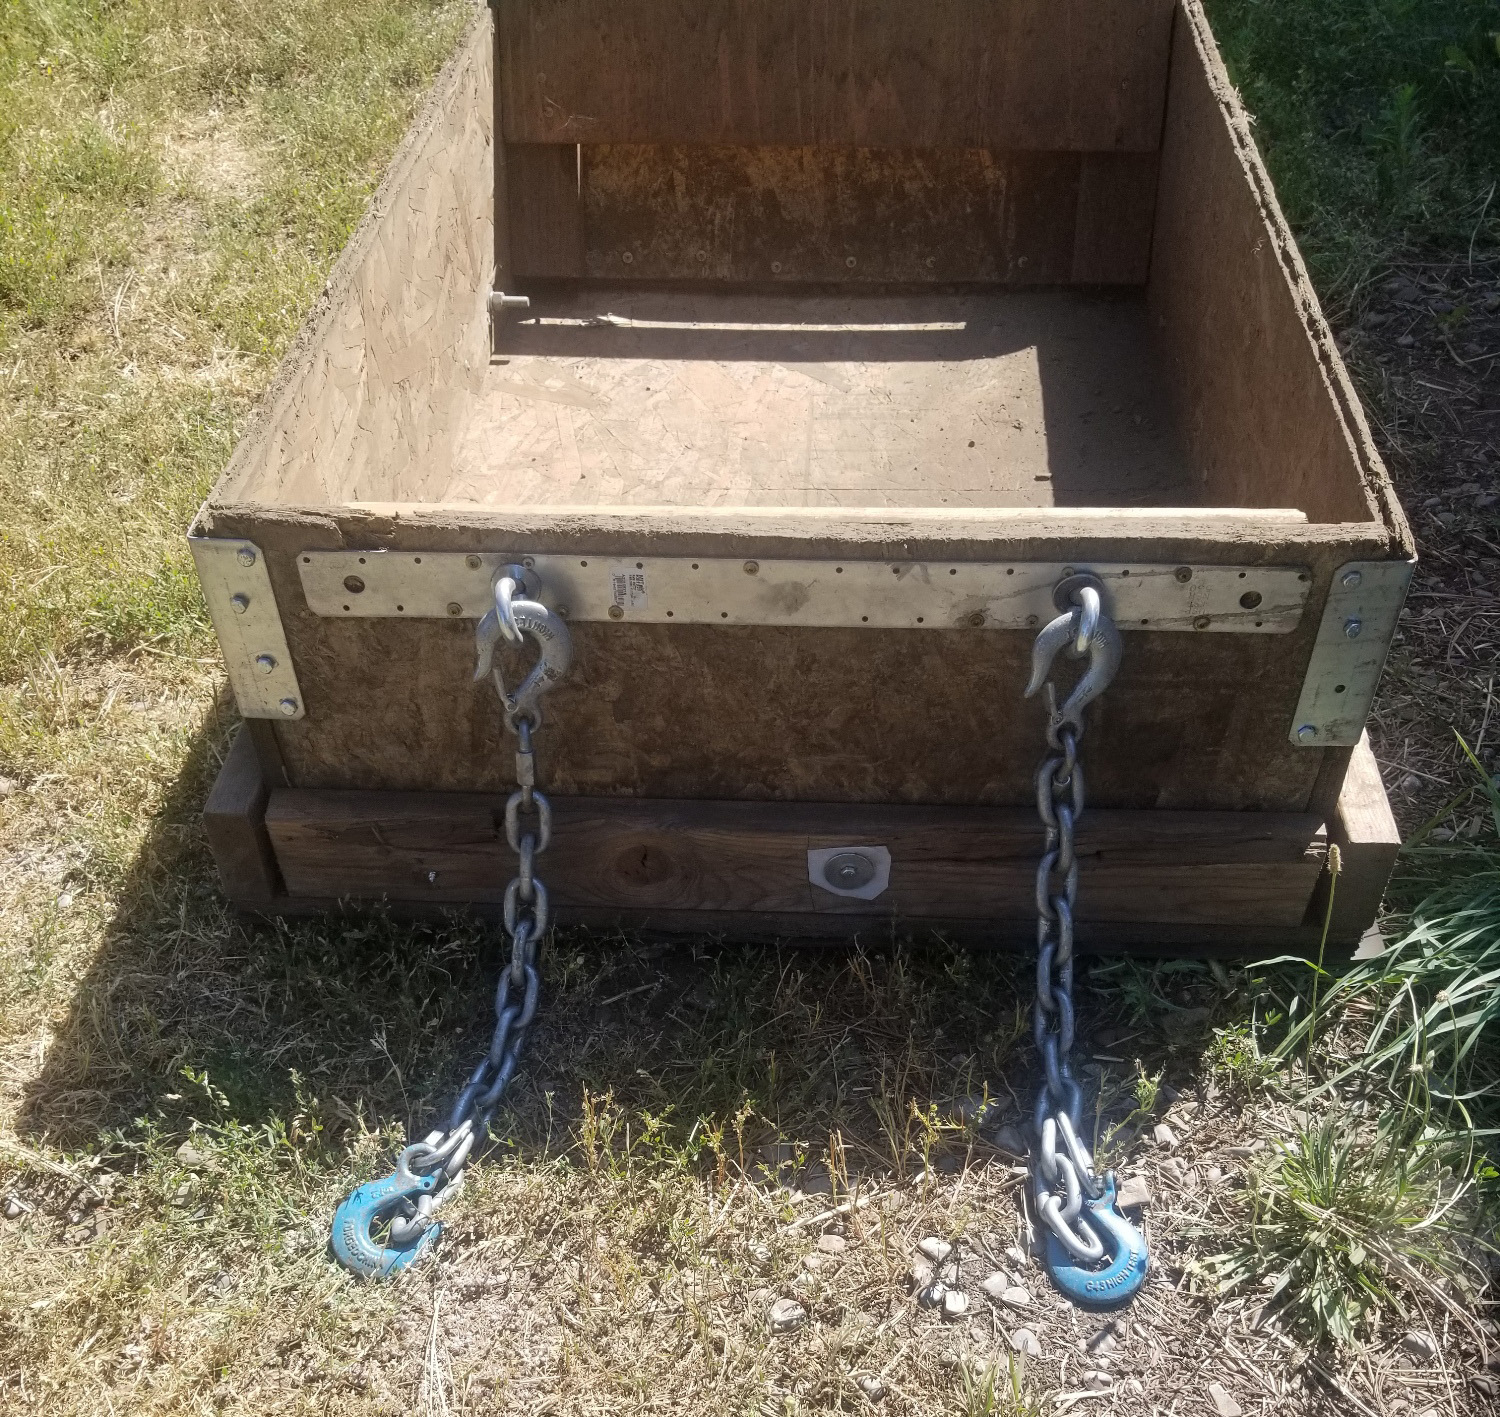
The Stone Boat
My stone boat needs rebuilding, but this is the one I've been using all this time and it hasn't fallen apart yet (although it will, I'm sure). It's made of 3/4" OSB and 2x4 and eye bolts. The bottom is covered with 1/8" UMHW plastic, screwed on with short screws, so it glides smoothly over the dirt and rocks. The front is angled up to catch the rocks and be pulled smoothly forward behind the picker. The back needs rebuilding so that it, too, is angled up and out, so that when I pull it to the rock pile I can just pull it rather than lifting the squared leading edge off the ground and pulling.
I figure the stone boat, when full, is carrying 1500 to 2000 lbs of rocks. I'm surprised that the OSB has held up as long as it has!
Two eyebolts near the side bottom with hooks and chains - the big blue hooks go on the lip of the tractor bucket to pick up the boat and empty it onto the rock pile - the single eyebolt attaches to the picker for pulling forward to collect rocks |
Two eyebolts at the back for pulling the boat to the rock pile - I use the same chains to pull the boat to the rock pile and then to pick up the side of the boat to empty it |
The single eyebolt on the starboard side is for pulling the boat behind the picker, collecting rocks |
|
|
ALWAYS fill the gear box with 80W-90 gear oil and spray lube the drive chain liberally, every time you use the picker. |
|
As you fill the stone boat, you'll find the rocks piling up in the front end of the boat. You need to stop when the front end is full and use a hand garden fork of some kind to claw the racks from the front to the back, so more rocks can pile up in the front and eventually fill the boat evenly. This is the most labor intensive part of using the rock picker, and I haven't figured out a way to automate that yet. If one of you figures out a solution to spreading the rocks evenly in the stone boat, please let me know! In fact, if you figure out a better way to do anything with my rock picker, I'd love to hear about it! |
Picker 2.0
I redesigned my arena rock picker into the Picker 2.0 and made a few improvements. First I added a bouncer, and then I rebuilt the frame from plywood sides into all steel.
The Bouncer
I found that when I ran the picker 1.0 through parts of the arena that has pockets of deep soft dirt or damp dirt, too much dirt and sand would build up on the conveyor belt and not shake through; too much dirt and sand was being carried over to the stone boat with the rocks. Also, I was losing too many rocks off to the side of the stone boat just because they would get flung off at odd angles (and I hated even one rock going back into the arena).
So I redesigned my stone boat to be wider than the back of the picker, with lightweight side deflectors than would guide the errant flying rocks into the stone boat.
Then I added a “bouncer” that would catch everything coming off the top of the picker belt and bounce it all through an expended metal screen, giving the sand and dirt one more opportunity to return to the arena floor and bouncing the rocks on down into the stone boat.

The bouncer pivots on a rod that runs across the picker just behind and below the top of the hook chain conveyor belt and runs downward to the center of the widened stone boat.

The bottom of the bouncer rests on two snail cams that are mounted on a rod that is supported on a framework that is attached solidly to the sides of the picker.

The snail cam rod is turned by a belt-and-pulley system that is turned by the same axle that turns the hook chain belt sprockets.

The cams are aligned on the rod to bounce under each side of the bouncer frame (steel angle iron). The cam rod pivots through a triangular frame that sticks out from each side of the back of the picker.
When the pulley-driven belt turns, the cams rotate and bounce against the bouncer frame, which makes the bouncer toss the dirt/sand/rocks up and down.
This setup requires that the stone boat sit about 2 feet back from the picker so the sand and dirt can fall through before they reach the stone boat; this makes the whole picker a little harder to turn in the corners of the arena, but the improvement in performance makes it worth the loss in turning efficiency.
I used a bandsaw to cut the snail cams out of 1” HDPE cutting boards from Amazon (same as I used for cutting the shaker rollers); then I fixed them on the cam rod by drilling very small holes through each cam and into the rod, keeping the two cams aligned with each other, and then I pushed finishing nails through each hole.
The New Steel Frame
Next I built a new steel frame for the picker so it could sit outside with the other farm equipment over the winter and in bad weather instead of inside the barn.

The new steel C-channel frame replaced the plywood sides. I had to re-create some of the framework to fit the new frame, and once finished I had it powder-coated to resist the weather. Looks great!

Moving everything over and re-fitting all the parts to the new frame took a little ingenuity, but it all came together and it works again! Now my arena, which is just native dirt and sand (and rocks), is rideable again and reasonably soft and deep after a good watering and harrowing.
I played with the angle and placement of the digger blade and took the angled side fins off the digger blade; I found that my original idea that the angle of the blade should match the belt angle and the position of the top of the blade should feed at the center of the bottom curve of the belt (rather than feeding dirt onto the top of the belt) works best, and removing the angled side fins from the blade allows the dirt to feed better (rather than piling up and stopping the feed).

New steel frame with 9” blade at same angle as belt, feeding to center of belt curve, with perpendicular vertical fins on each side to divide the dug dirt (no more angle to push the dirt toward center).
The rocks will come back every year and the arena will need to be picked several times each summer, but it is actually fun to do with the rock picker!

New wider stone boat and bouncer.

Picker on new steel frame.